ODI 12c new features: Dimension and Cubes! Part 1 (Settings)…
Today we’ll talk a little bit about the new feature introduced in ODI 12.2.1.1.0, Dimension and Cubes!
As everybody already know, Oracle is slowly merging OWB within ODI and in each release we can see a new feature from OWB arriving in ODI. This time were the Dimension and Cubes feature.
This feature helps you to create a DW based in a configuration that you do. Basically there is a new component in ODI that helps you to define the datastore to be mapped. Also, after you create all dimensions (that is the most time consuming part in the process), the cube or fact table creation and mapping is a lot easier than do it manually.
Right now there is just one type of dimension available (Star schema level based dimension), but in the future other kinds will be supported like snow flake and others.
Ok, let’s start. There’re two ways to build a star dimension in ODI: with natural key’s (where the natural key is stored in the FACT table) and with surrogate keys (where the surrogate key is stored in the FACT table). In this post we’ll cover how we create a DW using the natural key process since the surrogate key one is buggy (the interface fails on saving the surrogate key) and we have openned a SR with Oracle to get it fixed. As soon we have the fix we’ll cover that too here in the blog.
In the Designer tab we can now see that we have a new tab called Dimensions and Cubes.
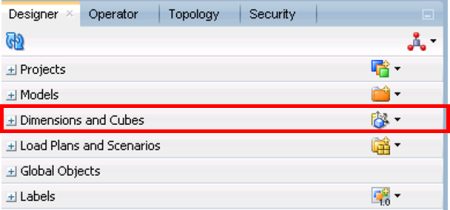
Opening that tab you will find a blank area, you need to click the button in the “Dimension and Cubes” tab, and you can create a new DM or DW.
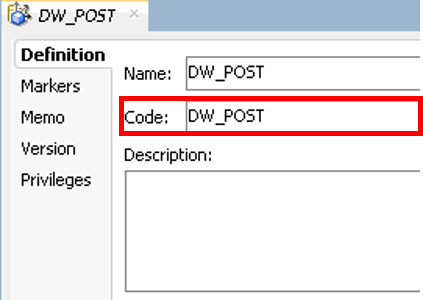
By the way, here’s the first small bug. For some reason when you write the name you want, ODI does not fill automatically the code field (as it always do for all the other objects in ODI), then you need to manually insert a code there. Remember, no spaces and no special character.
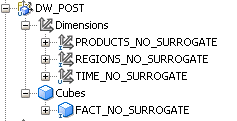
After that we can expand it and see the Dimension and the Cube node.
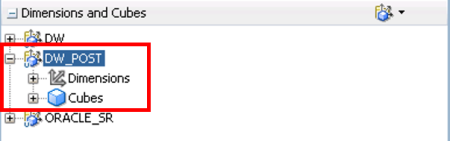
Right click on those and we can create a new Dimension or Cube. As everybody knows, the dimension comes first since we need them to maintain the data integrity of the cube.
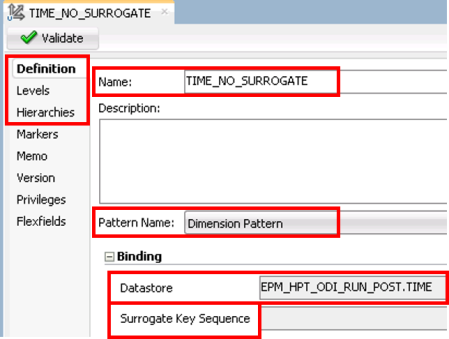
Here you can give any name you want for the dimension. Also you have a Pattern Name (that has just one option by now) and in the side tabs we have all possible options for the Dimension, Levels and Hierarchies, that we’ll cover later.
There are two more option here: the Datastore, that is the target dimension datastore where all metadata will flow and the Surrogate key Sequence that you need to set in case you want to create a dim using surrogate key (We’ll cover this later since we have a bug here).
In our case we’ll have three dimensions and one cube. (Time, Products, Regions and Fact). Both the source and the targets tables were generated by me with dummy data, just for this post. If you want to replicate this example, the scripts are here:
Let’s create the Time dimension. Click in the “Levels” in the left side tabs and you will see a big screen in three big sessions: Levels, Levels Attributes and Parent Level References.

Let’s begin with the level configuration. Clicking in the  button will create a Level.

I always like to rename the Level to something more meaningful like “Year” but if you like you can keep as default. By the default the target datastore comes automatically mapped since you define it in the previous screen. The only thing left here is to define the “Staging Datasore”.
This is something that we didn’t understood why it was made in this way since ODI could create automatically based in the definitions we had in the previous step or even with the interface configuration.
Anyway, what we need to do is create the stage tables for each level, and for that we have a few approaches we can do here:
- We can create another table exactly in the same way of the target table (needs to be a new table because the way ODI integrates the data. We’ll cover that latter).
- We can create, in this case, 3 tables, one for Year (same way as the source table is), and one for Quarter (same way of the source plus all columns from the Year table) and one for Month (same way of the source plus Quarter and Year columns).
- And we can duplicate the sources or the target datastore and do the changes above (in the 2 approach).
With the Stage datastores created (manually or by reverse) we just need to click in the “…” button and choose it from the list. Now we just need to repeat the step 2 more times for the other levels:

After we associate the source datastores and the stage datastores it’s time to create the attributes and ID’s for each level. For this you just need to click in the Year level and click in the button below:

Here we need to create all the attributes for this level and the natural key for that level as well. (We have the option to create slowly change dimensions here, but this will be covered in a future post!)
For each attribute you need to and fill the name of the attribute, set the data type (yes it not get automatically….) and select the Stage attribute (click in the “…” button and select it).
After all Attributes and ID’s we need to click in the below to set the natural key of that level. Just select in the list available.
After that, we just need to repeat for all the other 2 levels that we’ll have in this dimension.
With this done, the last step for this tab is to create the relationship between one level and its parent level. For this, highlight each level again, in this case we’ll start from bottom up, then let’s start clicking in the Month level and click on button below. Here we just need to say that for the Month level his reference parent will be Quarter. To set this we just need to select the Quarter level from the drop box and select eh foreign key from the drop box as well. Do that again for the Quarter level and reference it to the Year level. We don’t need to create any reference for the Year since it has no parent.

As you can see, after the level configuration, everything you need to do is click in buttons and select from drop box or from “…” Screen (other than rename the defaults values if you like).
For last but not least, we need to click in the tab Hierarchies on the left tabs to enable us create a new hierarchy.
This is something fun. We can create multiple hierarchies inside the target table as well as skip level and some other features that we’ll cover in another post. For now let’s stay with a single hierarchy.

Here we need just to create the hierarchy by clicking in the button, give a name for the hierarchy and then click in the plus button bellow and add all the levels for the hierarchy. The order doesn’t matter, the idea here is that you can have multiple hierarchies with different levels in each one. For example, we could have a hierarchy called Full_Time with Year->Quarter->Month and another Hierarchy called Small_Time with just Year->Month. ODI would know based in the configurations we did, how to handle the data. Nice.
Also we can set skip level for each level we defined.
We are done with the dimension settings. I know it’s a lot of settings and some of you could be thinking (as we thought, this is a lot more work than if I create manually), but believe me, after you get used, you can do it in a reasonable time and the cube part is worthy.
Now we just need to repeat the process for all the other 2 dimension and them we finally start the cube settings:
To start the same thing as the dimension, Right click in the Cubes node and new.
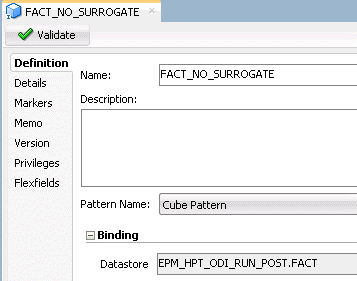
In this screen we need to give a name for the cube, select a pattern name (Same as Dimension, just one option here for now) and do a biding to the target datastore.
After that we just need to click in the Detail tab in the left menu and start to configure our fact table.

As I said in the beginning, here’s where the use of this components pays off. To configure a cube we just need click in the button and add all dimension we have, in this case our three dimensions. Then we just need to select the level we want to join our Fact table with our dimensions and bind the keys from the fact and that dimension.
For the last but not the least we just need to create by the measures that the Fact table will have. Same as the attributes in the dimensions: Name of the measure, Datatype and the column that will receive the data.
And that’s it. We are all set to move to the Mappings. Since this is already a huge post, I’ll stop this one now and will start a new post just for the Mappings, since I want to analyze how ODI builds the queries and loads the data there.
Hope you guys enjoy this post and see you soon.

September 14, 2016 at 4:57 pm
[…] on loading the dimensions and fact tables that where created using natural keys (please see our previous post for all the settings required for those […]
November 24, 2016 at 12:09 pm
[…] busy. So let’s not waste time and go directly to what matters. I really recommend you to ready part 1 and part 2 (if you didn’t already) because we will assume some things here that were already […]
February 13, 2017 at 10:30 am
I understand this is an old post but if you have snapshots please replace them with high resolution as we can’t see the text on them.
February 15, 2017 at 7:58 am
Hi Aneel how are you? I just fixed that. You see, the snapshots were in high resolution, the problem is that I forgot to enable the link to enlarge the picture. Now i believe you’ll be able to see all the snapshots.
Sorry for that and thank you for pointing it out 🙂