Archive for ACE

How to use Jython to send a dynamic HTML table email from ODI (part 1/2)

Posted in Uncategorized with tags , , , , , , on April 21, 2020 by RZGiampaoli

Hey guys how are you? Today I’ll talk a little bit how can we create a dynamic HTML table email from ODI using Jython.

First of all, let me give you a little bit of context. I had to build an ODI process to restate the past data in our DW. That means, the business wanted, to a certain point in time, to go back all the way to the first period we have in our DW and restate the data based in a map table that they provided.

That’s all right, the biggest problem is that this table is partitioned by Source System and Period, and the business wanted the process to be flexible enough to let them run 1 period and 1 source system at time or to run an range of period and ALL sources at time (and any combination of these 2).

Also all right, my problem now is how to provide the business with a reliable way to tell them what they already run, what is still pending, if we had an error in a period or if there’s some validation fall outs in a period. In other words, how to track the process during execution.

My answer to that, I decide to send a email with a table that shows the source system and years in the rows and the months in the columns, and based in a color code, I paint the cells based in the status of the execution.

This post will be about the Jython/HTML code we wrote and the next post will be about how to make it dynamic in ODI. Let’s start it with the Jython part:

import smtplib

from email.mime.multipart import MIMEMultipart
from email.mime.text import MIMEText

mailFrom = "ODI Services <donotreply@ODI.com>"
mailSend = 'email@here.com'

msg = MIMEMultipart()
msg['Subject'] = "Subject here"
msg['From'] = mailFrom
msg['To'] = mailSend

html = 
"""\

HTML CODE HERE

"""

part = MIMEText(html, 'html')
msg.attach(part)
s = smtplib.SMTP('SMTP SERVER HERE')
s.sendmail(mailFrom, mailSend.split(','), msg.as_string())
s.quit()

This is everything you need to have in your procedure to send a HTML code by email. It’s a very simple code, basically we import “smtplib” lib and that will handle the email sending, after that we just need to inform the user, password and SMTP server and use the “sendmail” to send the email. Pretty straight forward.

Now, in the meddle of the code, we have the HTML part that needs to be included. In our case, it’ll be a table. To test the HTML code, you can google “HTML test runner” that it’ll bring a lot of places in the internet where you can run your HTML code and test to see the results. It’s pretty handy, and I’m using this one here.

To create a simple table in HTML we just need this code here:

This code is also fairly simple and basically we have:

  1. <TABLE> tag, where you define the margins, border size, width of the table, cell padding and cell spacing. There’s more options there but you can easily find in the HTML doc.
  2. <TR> tag, where you define the amount of columns using the COLSPAN property as well the alignment of the text there
  3. <TH> tag, where we define the cells of our table itself. There’re a lot of properties for this but I’m using juts a fix 20% width for each cell, just to size them the same (since I have 5 columns), the Color of the cells and the message I want to send.

This is my legend table that will come above my real table, but the configuration is the same in both cases. We’ll have one <TR> block for each line we want to have and as much <TH> lines we need for each cell we want to have. In the end my final table is like this:

As you can see, I send an email with all periods that needs to be restatement showing if the interface already ran, if that was a success, or it had warnings or errors (with the link straight to the error file, if it was not loaded yet and even if we don’t had the partition created for that period/source.

Now, as I said, we need one <TR> per line and, in this case, 16 <TH>, one per cell. As you can imagine, that’s a lot of code that needs to be write there. thanks god I’m using ODI to do that for me, and we’ll take a look on this in the next post.

Thank you guys and see you soon.

Oracle SQL for EPM Tips and Tricks S01EP11

Posted in ACE, Data Warehouse, Hacking, ODI, ODI 10g, ODI 11g, ODI 12c, Oracle, Oracle Database with tags , , , on March 25, 2020 by RZGiampaoli

Hey guys how are you?

Today I’ll post something that is very simple but very useful specially when working with ODI.

When we work with partitioned table we know that if we filter that table by the partitioned column Oracle will use that partition as source of data. But what if we are doing an Insert, Update or Merge?

There’s another way to explicit refer to a partition and make sure Oracle will be working inside that one and is by defining it in the From clause.

For example if I want to query the Partition “DELL_BALANCES_FY20_FEB” I can query:

As we can see, after the table name I specified the PARTITION (DELL_BALANCES_FY20_FEB) and put inside the parentheses the partition name (don’t specify as string) and that makes oracle distinct all the rows in that partition, and my Distinct of the PARTITION_KEY shows only one results as expected. (this command needs to come before the table alias).

If we are doing an Insert, Update or Merge the idea is the same:

This way we can, specially in the MERGE, make sure Oracle will be working in the right partition in the target table.

And it’s specially useful with ODI because we always know the partition we want to query or insert data when we use ODI, then we can always bind Oracle to a specific partition and make sure he’ll stay there.

I hope this is help full and see you soon.

ORACLE SQL for EPM tips and tricks S01EP05!

Posted in ACE, Connect By, DEVEPM, Dimensions, EPM, ETL, Oracle, Oracle 11.2.0, Oracle 11.2.0.4, Oracle Database, Query, REGEXP, SQL, Tips and Tricks with tags , , , , on May 3, 2019 by RZGiampaoli

Continuing the Oracle SQL for EPM series today we’ll see another usage of Connect by. I’m talking a lot about connect by because is a very useful function and we should use it a lot in the analytic space.

Let’s imagine that we are working with a planning application and we want to figure out in a query what is the region of each cost center and to what top level that cost centers belong. In this app we have the Entity dimension with Support Geography as a attribute.

The support geography has the region on the generation 2 of the hierarchy. How can we do that. Well, connect by to the help.

First of all we need to get the entire physical geography hierarchy. To do that we’ll do a query like this:

This is a simple query that joins the HSP_ATTRIBUTE_MEMBER table (this table contains all the attributes from all attribute dimensions) that’s why we have that sub-query to select just the Support Geography members (1).

Then we join this table with the HSP_OBJECT that contains all metadata from everything in Planning: Forms, Dimensions, Flows, everything. We do that to get the name of the members. And finally we do a connect by to rebuild the hierarchy (2).

With the hierarchy re-built we can use the Connect by root to figure out to witch top level each member belongs. (3)

With this query we know what’s the leaf member of the Support Geography dimensions (ID) and to what Region that member belong. Now we need to do the same for the Entity dimension.

With this query we are filtering the OBJECT_TYPE=33, that means Entity (1) (If you want to know what are the possible object types you can query the HSP_OBJECT_TYPE table to check that out), and then we do a Connect By to re-built the hierarchy and then use some Connect by Root to get the parents as well the Sys connect By Path to get the Path of the hierarchy.

Now we just need to join everything under the same query to get all the Cost Centers and to witch top level each one belongs and to witch region they are part of as well.

Another thing that I like a lot about the WITH clause is that is very easy to create nested queries. In this case I created 2 different queries, each one with a WITH and a select based in that WITH. Now everything I need to do is put everything under the same with by:

We can see that now I just got the Select that was under the WITH clause and just created a nested WITH by just creating the step 1 and 2 and now I have instead of 2 WITH queries I have just 1 WITH with 4 Clauses under it being 2 of then a nested one based in the previous one (Connect by from the filtered query).

All we need to do is putting everything together by joining the ENT_HIER and the SG_HIER using the HSP_MEMBER_TO_ATTRIBUTE table. This table basically is the map between the ENTITY dimension and the Attribute dimensions, in this case Support Geography.

The results is the Cost Center, the Path of that member in the hierarchy and with this we can use the REGEXP to extract any level of the hierarchy, and finally the region that cost center belong.

You may thing why we need to do that. well, this is a query I used to join with the HSP_GROUP table to get the groups and the members from each region and then create the security dynamically for each user. That means, I have a Planning application with Entities that has cost centers from different regions and I’m using the Attribute dimension to generate the security.

If a User has access only to AMER data, it’ll only see the AMER cost centers. This is just one example of what we can achieve using Connect by.

I hope you guys enjoy. Next time we’ll talk about another very very useful function that I really love it.

See you soon guys.

ORACLE SQL for EPM tips and tricks S01EP02!

Posted in ACE, Connect By, EPM, Oracle Database, Performance, Query, SQL, Tips and Tricks, WITH Clause with tags , , , , , , , on March 21, 2019 by RZGiampaoli

hey guys how are you? Let’s continue the SQL for EPM series. Today I’ll continue to talk about With with a small bonus of Connect by :). let’s start.

A lot of people uses Connect By in a daily bases but as far I having seeing, most of then don’t know how to use it properly. I already lost count with the amount of people complaining about performance issue with Connect By.

The thing is, Connect By works a little different than everything else in Oracle. We can say that Connect By has 2 stages and we’ll see why I’m saying that with this example. Let’s get back to our metadata table and let’s do a Connect By to extract the Balance Sheet Hierarchy from the Juno application:

As we can see, inside this table we have more than one application and more than one hierarchies for each application. That’s ok, we just need to filter it in our SQL right?

If we filter the APP_NAME and the HIER_NAME we’ll get all accounts for that Application and this will generate 12,622 rows. By the way, this table has all metadata from all our applications and we always filter by APP_NAME and HIER_NAME to select what we want (the table is also partitioned and sub-partitioned by these 2 columns). It’s important to know that without filtering anything this table has:

Ok, now, if we want to get just the BS hierarchy we just need to do the Connect By right?

That works… perfect… or not? Well in fact, this the wrong way to use Connect by because what I said before, the 2 stages.

As you can see, this query took 25 sec just to return the first 50 rows. In a integration this will take way more time, in fact, if you join this table to a data table to do a SUM in the BS level, this will take ages to return.

The reason is that for the Connect by, first Oracle does everything that is after the word Connect by and after the word Start with and then, and only then, it does what is in the where condition. That means, first he did the connect by in those 2.260.372 rows (and they are all repeated) and then after all the processing, it filtered what we wanted, that is the APP_NAME and the HIER_NAME. Then the right way to use it is:

Now it looks way better. 0.375 seconds to do exactly the same thing as before, and the only thing I did was to move our filters to the right place. Now Oracle is filtering and doing the Connect by at same time.

Now, if you do a SYS_CONNECT_BY_PATH and want to get just the leaf (to have the complete path that the hierarchy does, you can filter the leafs in the where clause (and need to be there otherwise it’ll not have the entire hierarchy during the connect by). This is how:

Now you see that the connect by filtered what needs to be filter during the Connect by execution and afterwards, it filtered just the leafs (using the CONNECT_BY_ISLEAF that returns if a member is a leaf or not).

Also, i used the CONNECT_BY_ROOT to generate the Root member used in this query (BS) and the SYS_CONNECT_BY_PATH to generate the entire path of the metadata (Very useful to transform parent/child tables in generation tables using this Technic and a regexp [we’ll see this in another post]).

Ok, now that the “Bonus” is written, let’s talk about the WITH that was the main subject here. Even with this Connect by write in the right way with the filters in the right place, we can still improve the performance using WITH.

That’s right, the idea is to prepare our subset of data using WITH before we ask Oracle to do the Connect by and leave it as simple as possible. Let’s take a look:

This is by far the best way to use a Connect by clause. You can, instead of using WITH use a sub-query but I think this way is easier and more organised as well. Also, I know the time difference doesn’t look to big between the previous example and this one but when you join this with data and start to SUM everything, you’ll see a huge difference between this method and the previous one.

Also, some times Oracle get lost with the previous method making everything slower but with the WITH method, it never happens then I advise you start to use this.

I hope you guys enjoy this little tip and see you next time.

KScope 18 Speaker Award

Posted in ACE, Career, DEVEPM, EPM, Kscope, Kscope 18, ODI, ODI Architecture, ODTUG, PBCS with tags , , , , , , on September 17, 2018 by RZGiampaoli

Hey guys how are you?

It has been awhile since last time I wrote anything here…. and surprise, surprise, it’s because I’m crazy working in a project that was sized small but turn out huge and the size didn’t change…. 🙂 never happened before heheheh 😉

This is just a small post to tell how grateful and happy we are for receiving the EPM Data Integration Speaker Award in Kscope 18 with the presentation: How to Use Your ODI On-Premise to Seamlessly Integrate PBCS.

We start this blog in 2012 and we have been presenting at Kscope since 2013 and it has been very rewarding, not only because we become Oracle ACEs because of this, but because every single post or presentation we learn a lot with it.

When you do a presentation you need to stop to think in a solution for a specif project and start to thinking in a solution that can be used to all projects. This alone is a challenge, but the amount of thing we learn is a great deal. We can easily said that our code improved a lot since 2012 when we began with this blog and it’s in great part because of this blog and our presentations.

Then we thank you all of you that read our blog (even if we don’t post as much as we would like), to everybody that goes to KScope and decide to watch our presentations and to ODTUD that provide this bi-lateral learning platform.

Thank you all of you for supporting us and see you soon.

DEVEPM on Oracle Magazine

Posted in ACE, Career, DEVEPM, ETL, ODI with tags , , on November 16, 2017 by Rodrigo Radtke de Souza

Hi all!

Very quick post today! Rodrigo was interviewed by Oracle Magazine for the November/December issue. Check it out!

DEVEPM on Oracle Magazine

Thanks!

ODTUG Leadership Program 2018!!

Posted in ACE, DEVEPM, Kscope, Leadership Program, ODTUG, Uncategorized with tags , , , on September 1, 2017 by RZGiampaoli

Hi guys how are you?

ODTUG is opening the application for the 2018 leadership program. For those that don’t know what it is, it is a eight-month program (remote sessions) to help people to advance into leadership positions along their career track, improve their effectiveness in their current position or switch careers.

Rodrigo and I are past participants and we definitely advise anyone that wants to get involved and learn in the process to participate in this wonderful program.

To learn more about the program or give it a try you can click Here.

Hope you guys enjoy it.

ODI 12c new features: Dimension and Cubes! Part 1 (Settings)…

Posted in ACE, Configuration, Cubes, Dimensions, ETL, New Features, ODI, ODI 12c, ODI Architecture, ODI Mapping, Tips and Tricks with tags , , , , , , , , on August 19, 2016 by RZGiampaoli

Today we’ll talk a little bit about the new feature introduced in ODI 12.2.1.1.0, Dimension and Cubes!

As everybody already know, Oracle is slowly merging OWB within ODI and in each release we can see a new feature from OWB arriving in ODI. This time were the Dimension and Cubes feature.

This feature helps you to create a DW based in a configuration that you do. Basically there is a new component in ODI that helps you to define the datastore to be mapped. Also, after you create all dimensions (that is the most time consuming part in the process), the cube or fact table creation and mapping is a lot easier than do it manually.

Right now there is just one type of dimension available (Star schema level based dimension), but in the future other kinds will be supported like snow flake and others.

Ok, let’s start. There’re two ways to build a star dimension in ODI: with natural key’s (where the natural key is stored in the FACT table) and with surrogate keys (where the surrogate key is stored in the FACT table). In this post we’ll cover how we create a DW using the natural key process since the surrogate key one is buggy (the interface fails on saving the surrogate key) and we have openned a SR with Oracle to get it fixed. As soon we have the fix we’ll cover that too here in the blog.

In the Designer tab we can now see that we have a new tab called Dimensions and Cubes.

1-Dimension and Cubes

Opening that tab you will find a blank area, you need to click the button in the “Dimension and Cubes” tab, and you can create a new DM or DW.
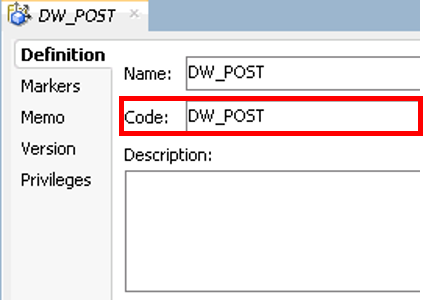
2-DW creation

By the way, here’s the first small bug. For some reason when you write the name you want, ODI does not fill automatically the code field (as it always do for all the other objects in ODI), then you need to manually insert a code there. Remember, no spaces and no special character.

After that we can expand it and see the Dimension and the Cube node.

3-DW creation

Right click on those and we can create a new Dimension or Cube. As everybody knows, the dimension comes first since we need them to maintain the data integrity of the cube.

4-Dimension Definition

Here you can give any name you want for the dimension. Also you have a Pattern Name (that has just one option by now) and in the side tabs we have all possible options for the Dimension, Levels and Hierarchies, that we’ll cover later.

There are two more option here: the Datastore, that is the target dimension datastore where all metadata will flow and the Surrogate key Sequence that you need to set in case you want to create a dim using surrogate key (We’ll cover this later since we have a bug here).

In our case we’ll have three dimensions and one cube. (Time, Products, Regions and Fact). Both the source and the targets tables were generated by me with dummy data, just for this post. If you want to replicate this example, the scripts are here:

No surrogate Script

Let’s create the Time dimension. Click in the “Levels” in the left side tabs and you will see a big screen in three big sessions: Levels, Levels Attributes and Parent Level References.

5-Level Canvas

Let’s begin with the level configuration. Clicking in the Plus Sign button will create a Level.

6-Level Creation

I always like to rename the Level to something more meaningful like “Year” but if you like you can keep as default. By the default the target datastore comes automatically mapped since you define it in the previous screen. The only thing left here is to define the “Staging Datasore”.

This is something that we didn’t understood why it was made in this way since ODI could create automatically based in the definitions we had in the previous step or even with the interface configuration.

Anyway, what we need to do is create the stage tables for each level, and for that we have a few approaches we can do here:

  1. We can create another table exactly in the same way of the target table (needs to be a new table because the way ODI integrates the data. We’ll cover that latter).
  2. We can create, in this case, 3 tables, one for Year (same way as the source table is), and one for Quarter (same way of the source plus all columns from the Year table) and one for Month (same way of the source plus Quarter and Year columns).
  3. And we can duplicate the sources or the target datastore and do the changes above (in the 2 approach).

With the Stage datastores created (manually or by reverse) we just need to click in the “…” button and choose it from the list. Now we just need to repeat the step 2 more times for the other levels:

7-Level Canvas mapps

After we associate the source datastores and the stage datastores it’s time to create the attributes and ID’s for each level. For this you just need to click in the Year level and click in the Plus Sign button below:

8-Level attibutes config

Here we need to create all the attributes for this level and the natural key for that level as well. (We have the option to create slowly change dimensions here, but this will be covered in a future post!)

For each attribute you need to Plus Sign and fill the name of the attribute, set the data type (yes it not get automatically….) and select the Stage attribute (click in the “…” button and select it).

After all Attributes and ID’s we need to click in the below Plus Sign to set the natural key of that level. Just select in the list available.

After that, we just need to repeat for all the other 2 levels that we’ll have in this dimension.

With this done, the last step for this tab is to create the relationship between one level and its parent level. For this, highlight each level again, in this case we’ll start from bottom up, then let’s start clicking in the Month level and click on Plus Sign button below. Here we just need to say that for the Month level his reference parent will be Quarter. To set this we just need to select the Quarter level from the drop box and select eh foreign key from the drop box as well. Do that again for the Quarter level and reference it to the Year level. We don’t need to create any reference for the Year since it has no parent.

9 Parent Level References

As you can see, after the level configuration, everything you need to do is click in buttons and select from drop box or from “…” Screen (other than rename the defaults values if you like).
For last but not least, we need to click in the tab Hierarchies on the left tabs to enable us create a new hierarchy.

This is something fun. We can create multiple hierarchies inside the target table as well as skip level and some other features that we’ll cover in another post. For now let’s stay with a single hierarchy.

10-hierarchy

Here we need just to create the hierarchy by clicking in the Plus Sign button, give a name for the hierarchy and then click in the plus button bellow and add all the levels for the hierarchy. The order doesn’t matter, the idea here is that you can have multiple hierarchies with different levels in each one. For example, we could have a hierarchy called Full_Time with Year->Quarter->Month and another Hierarchy called Small_Time with just Year->Month. ODI would know based in the configurations we did, how to handle the data. Nice.

Also we can set skip level for each level we defined.

We are done with the dimension settings. I know it’s a lot of settings and some of you could be thinking (as we thought, this is a lot more work than if I create manually), but believe me, after you get used, you can do it in a reasonable time and the cube part is worthy.

Now we just need to repeat the process for all the other 2 dimension and them we finally start the cube settings:
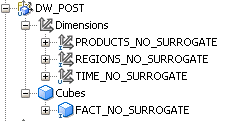
11-Cube

To start the same thing as the dimension, Right click in the Cubes node and new.

12-Cube definition

In this screen we need to give a name for the cube, select a pattern name (Same as Dimension, just one option here for now) and do a biding to the target datastore.
After that we just need to click in the Detail tab in the left menu and start to configure our fact table.

12-Cube config

As I said in the beginning, here’s where the use of this components pays off. To configure a cube we just need click in the Plus Sign button and add all dimension we have, in this case our three dimensions. Then we just need to select the level we want to join our Fact table with our dimensions and bind the keys from the fact and that dimension.

For the last but not the least we just need to create by Plus Sign the measures that the Fact table will have. Same as the attributes in the dimensions: Name of the measure, Datatype and the column that will receive the data.

And that’s it. We are all set to move to the Mappings. Since this is already a huge post, I’ll stop this one now and will start a new post just for the Mappings, since I want to analyze how ODI builds the queries and loads the data there.

Hope you guys enjoy this post and see you soon.

PBCS, BICS, DBCS and ODI!!! Is that possible???

Posted in 11.1.1.9.0, 11.1.2.4, ACE, BICS, DBCS, EPM, EPM Automate, ODI, ODI 10g, ODI 11g, ODI 12c, ODI Architecture, ODI Architecture, Oracle, OS Command, PBCS, Performance, Uncategorized with tags , , , , , , , on August 15, 2016 by RZGiampaoli

Hey guys, today I’ll talk a little bit about architecture, cloud architecture.

I just finished a very exciting project in Brazil and I would like to share how we put everything together for a 100% cloud solution that includes PBCS, BICS, DBCS and ODI. Yes ODI and still 100% cloud.

Now you would be thinking, how could be 100% cloud if ODI isn’t cloud yet? Well, it can be!

This client doesn’t have a big IT infrastructure, in fact, almost all client’ databases are supported and hosted by providers, but still, the client has the rights to have a good forecast and BI tool with a strong ETL process behind it right?

Thanks to the cloud solutions, we don’t need to worry about infrastructure anymore (or almost), the only problem is… ODI.

We still don’t have a KM for cloud services, or a cloud version of ODI, them basically we can’t use ODI to integrate could tools….

Or can we? Yes we can 🙂

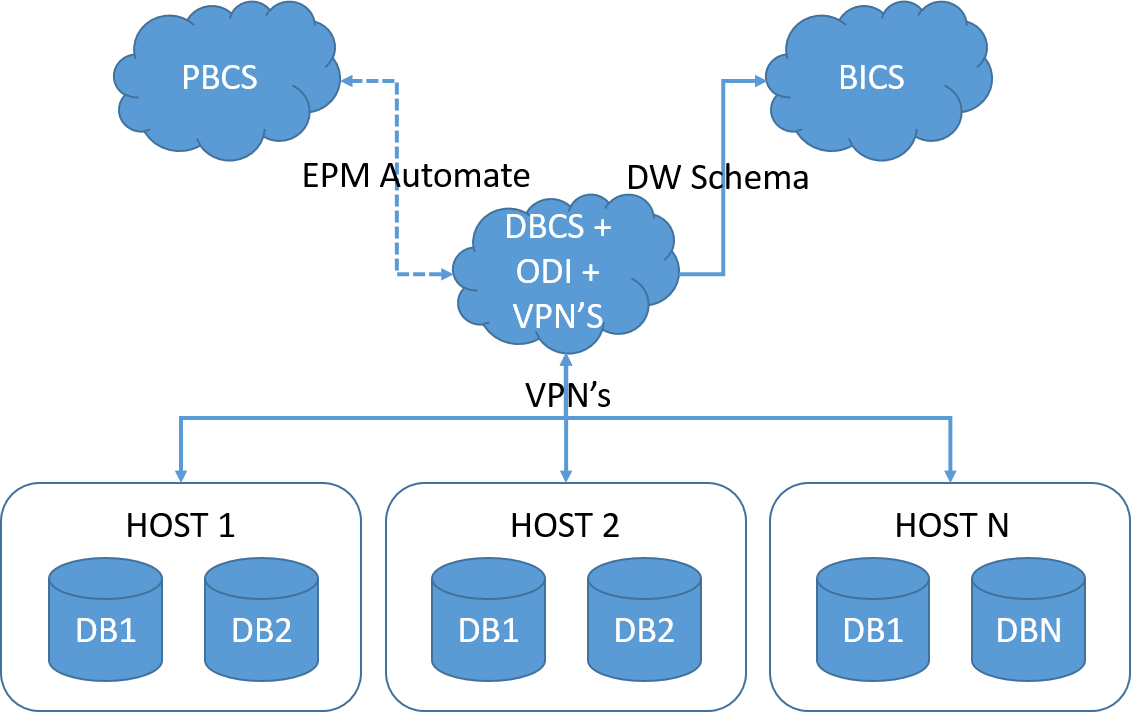
The design is simple:

  1. PBCS: Basically we’ll work in the same way we would if it was just it.
  2. BICS: Same thing here, but instead of use the database that comes with BICS, we need to contract a DBCS as well and point the DW schema to it.
  3. DBCS: here’s the trick. Oracle’s DBCS is not else then a Linux machine hosted in a server. That means, we can install other things in the server, other things like ODI and VPN’s.
  4. ODI: we just need to install it in the same way we would do in an on premise environment, including the agent.
  5. VPN’s: the final touch, we just need to create VPN’s between the DBCS and the client DB’s, this way ODI will have access to everything it needs.

Yes you read it right, we can install ODI in the DBCS, and that makes ODI a “cloud” solution.

cloud solution

The solution looks like this:

BICS: It’ll read directly from his DW schema in the DBCS.

PBCS: There’re no direct integration between the PBCS and DBCS (where the ODI Agent is installed), but I found it a lot better and easy to integrate them using EPM Automate.

EPM Automate: With EPM Automate we can do anything we want, extract data and metadata, load data and metadata, execute BR and more. For now the easiest way to go is create a script and call it from ODI, passing anything you need to it.

VPN’s: For each server we need to integrate we’ll need one VPN created. With the VPN between the DBCS and the hosts working, use ODI is extremely strait forward, we just need to create the topology as always, revert anything we need and work in the interfaces.

And that’s it. With this design you can have everything in the cloud and still have your ODI behind scenes! By the way, you can exactly the same thing with ODI on premise and as a bonus you can get rid of all VPN’s.

In another post I’ll give more detail about the integration between ODI and PBCS using EPM Automate, but I can say, it works extremely well and as far I know is a lot easier than FDMEE (at least for me).

Thanks guys and see you soon.