Archive for Integration

ODI KMs for HFM 11.1.2.4

Posted in 11.1.1.9.0, ACE, Configuration, DEVEPM, ETL, Hacking, HFM, Knowledge Models, ODI, ODI 11g, ODI Architecture, Uncategorized with tags , , , , , on March 3, 2017 by RZGiampaoli

Hi guys how are you? Today we are proud to announce that we are making available the ODI KMs for HFM 11.1.2.4.

—- EDITED on June/17 —-

We developed these KMs around 6 months ago, but we were waiting to release them together with an article that we wrote for Oracle.

Since OTN had some “Priority changes”, our article was postponed to later this year. As we had some people asking for these KMs we decide to release the KMs now and when the article is published we will let you guys know as well.

The article is live here! And if you guys are having errors with our KMs, please check our troubleshooting post here.

—- EDITED on June/17 —-

Prior to version 11.1.2.4, ODI could be easily used for HFM integration processes. ODI used its KMs with specific HFM drivers (HFMDriver.dll) provided by Oracle that were used to access and manipulate HFM applications. However, on HFM’s latest version, Oracle decided to remove its support for ODI, meaning that all HFM integrations would have to move from ODI to either manual iteration with HFM, usage of another integration tool (Like FDMEE) or create custom code using the new Java HFM API.

Since we didn’t want to re-write all our ODI environment and also none of the above options are robust enough, we decided to recreate the ODI KMs using Java HFM API. For these KMs to work we need to do two things: import them from ODI Java Net and do some setup in the ODI agent.

In the article we explain all options and how do we came up with this solution, but here we will not talk about it since we want you guys to read our article as well and we can’t use the content of the article here since we already signed an exclusivity agreement with Oracle.

The first part is easy and you just need to download the files from the link below

ODI KMS for HFM 11.1.2.4

The second one is more difficult. We need to make the new HFM Jars available to the ODI Agent and in order to do so we have two options:

Install the agent in the HFM machine OR copy the necessary jar files to the agent drivers folder (oracledi\agent\drivers).

If your architecture allows to have both HFM and ODI agent in the same server, then you may use this approach, which is very simple. The only thing to do is to change odiparams file (oracledi\agent\bin\odiparams.bat file in a standalone agent) and add the location of those three HFM jar files. Open odiparams.bat file and search for “ODI_ADDITIONAL_CLASSPATH”. On that setting, just set the location of the HFM jar files, as below (this is just an example. Please adjust the path accordingly to your environment):

set ODI_ADDITIONAL_CLASSPATH=%ODI_ADDITIONAL_CLASSPATH%;

“D:\Oracle\Middleware\EPMSystem11R1\common\jlib\11.1.2.0\epm_j2se.jar”;

“D:\Oracle\Middleware\EPMSystem11R1\common\jlib\11.1.2.0\epm_thrift.jar”;

“D:\Oracle\Middleware\EPMSystem11R1\common\jlib\11.1.2.0\epm_hfm_server.jar”

Save the file, restart the ODI agent and it is done

If you decide to go with the second option, we’ll provide a list of all the necessary jars (be prepared… it’s huge). In the article we explain how to identify all the necessary jar files in a systematic way but here this is not an option as explained before.

Search for all the Jars in the below list and copy all of them under oracledi\agent\drivers folder.

adm.jar
admaps.jar
admodbo.jar
ap.jar
ArtifactListing.jar
audit-client.jar
axiom-api-1.2.10.jar
axiom-impl-1.2.10.jar
axis-ant.jar
axis-jaxrpc-1.2.1.jar
axis.jar
axis2-adb-1.5.4.jar
axis2-kernel-1.5.4.jar
axis2-transport-http-1.5.4.jar
axis2-transport-local-1.5.4.jar
backport-util-concurrent.jar
broker-provider.jar
bsf.jar
castor-1.3.1-core.jar
castor-1.3.1.jar
com.bea.core.apache.commons.collections_3.2.0.jar
com.bea.core.apache.commons.net_1.0.0.0_1-4-1.jar
com.bea.core.apache.commons.pool_1.3.0.jar
com.bea.core.apache.log4j_1.2.13.jar
com.bea.core.apache.regexp_1.0.0.0_1-4.jar
com.bea.core.apache.xalan_2.7.0.jar
com.bea.core.apache.xml.serializer_2.7.0.jar
com.oracle.ws.orawsdl_1.4.0.0.jar
commons-cli-1.1.jar
commons-codec-1.4.jar
commons-compress-1.5.jar
commons-configuration-1.5.jar
commons-dbcp-1.4.0.jar
commons-discovery-0.4.jar
commons-el.jar
commons-fileupload-1.2.jar
commons-httpclient-3.1.jar
commons-io-1.4.jar
commons-lang-2.3.jar
commons-validator-1.3.1.jar
cpld.jar
css.jar
cssimportexport.jar
ctg.jar
ctg_custom.jar
dms.jar
epml.jar
epm_axis.jar
epm_hfm_web.jar
epm_j2se.jar
epm_jrf.jar
epm_lcm.jar
epm_misc.jar
epm_stellant.jar
epm_thrift.jar
essbaseplugin.jar
essbasestudioplugin.jar
ess_es_server.jar
ess_japi.jar
fm-actions.jar
fm-adm-driver.jar
fm-web-objectmodel.jar
fmcommon.jar
fmw_audit.jar
glassfish.jstl_1.2.0.1.jar
hssutil.jar
httpcore-4.0.jar
identitystore.jar
identityutils.jar
interop-sdk.jar
jacc-spi.jar
jakarta-commons.jar
javax.activation_1.1.jar
javax.mail_1.4.jar
javax.security.jacc_1.0.0.0_1-1.jar
jdom.jar
jmxspi.jar
jps-api.jar
jps-common.jar
jps-ee.jar
jps-internal.jar
jps-mbeans.jar
jps-unsupported-api.jar
jps-wls.jar
js.jar
json.jar
jsr173_1.0_api.jar
lcm-clu.jar
lcmclient.jar
LCMXMLBeans.jar
ldapbp.jar
ldapjclnt11.jar
libthrift-0.9.0.jar
log4j-1.2.14.jar
lucene-analyzers-1.9.1.jar
lucene-core-1.9.1.jar
lucene-spellchecker-1.9.1.jar
neethi-2.0.4.jar
ojdbc6dms.jar
ojdl.jar
opencsv-1.8.jar
oraclepki.jar
org.apache.commons.beanutils_1.8.3.jar
org.apache.commons.digester_1.8.jar
org.apache.commons.logging_1.1.1.jar
osdt_cert.jar
osdt_core.jar
osdt_xmlsec.jar
quartz.jar
registration_xmlBeans.jar
registry-api.jar
resolver.jar
saaj.jar
scheduler_ces.jar
servlet-api.jar
slf4j-api-1.5.8.jar
slf4j-log4j12-1.5.8.jar
sourceInfo.jar
stax-api-1.0.1.jar
wf_ces_utils.jar
wf_eng_agent.jar
wf_eng_api.jar
wf_eng_server.jar
wldb2.jar
wlpool.jar
wlsqlserver.jar
wsplugin.jar
xbean.jar
xmlparserv2.jar
xmlpublic.jar
xmlrpc-2.0.1.jar
XmlSchema-1.3.1.jar

Restart the ODI agent and it should be ready to execute any HFM Java code inside of ODI.

I know that this is a lot of jars and will take some time to find all of them but at least you’ll be able to upgrade you HFM and still use the same interfaces you have today in ODI to manage HFM (just remember to use the new data store objects reversed from the new RKM).

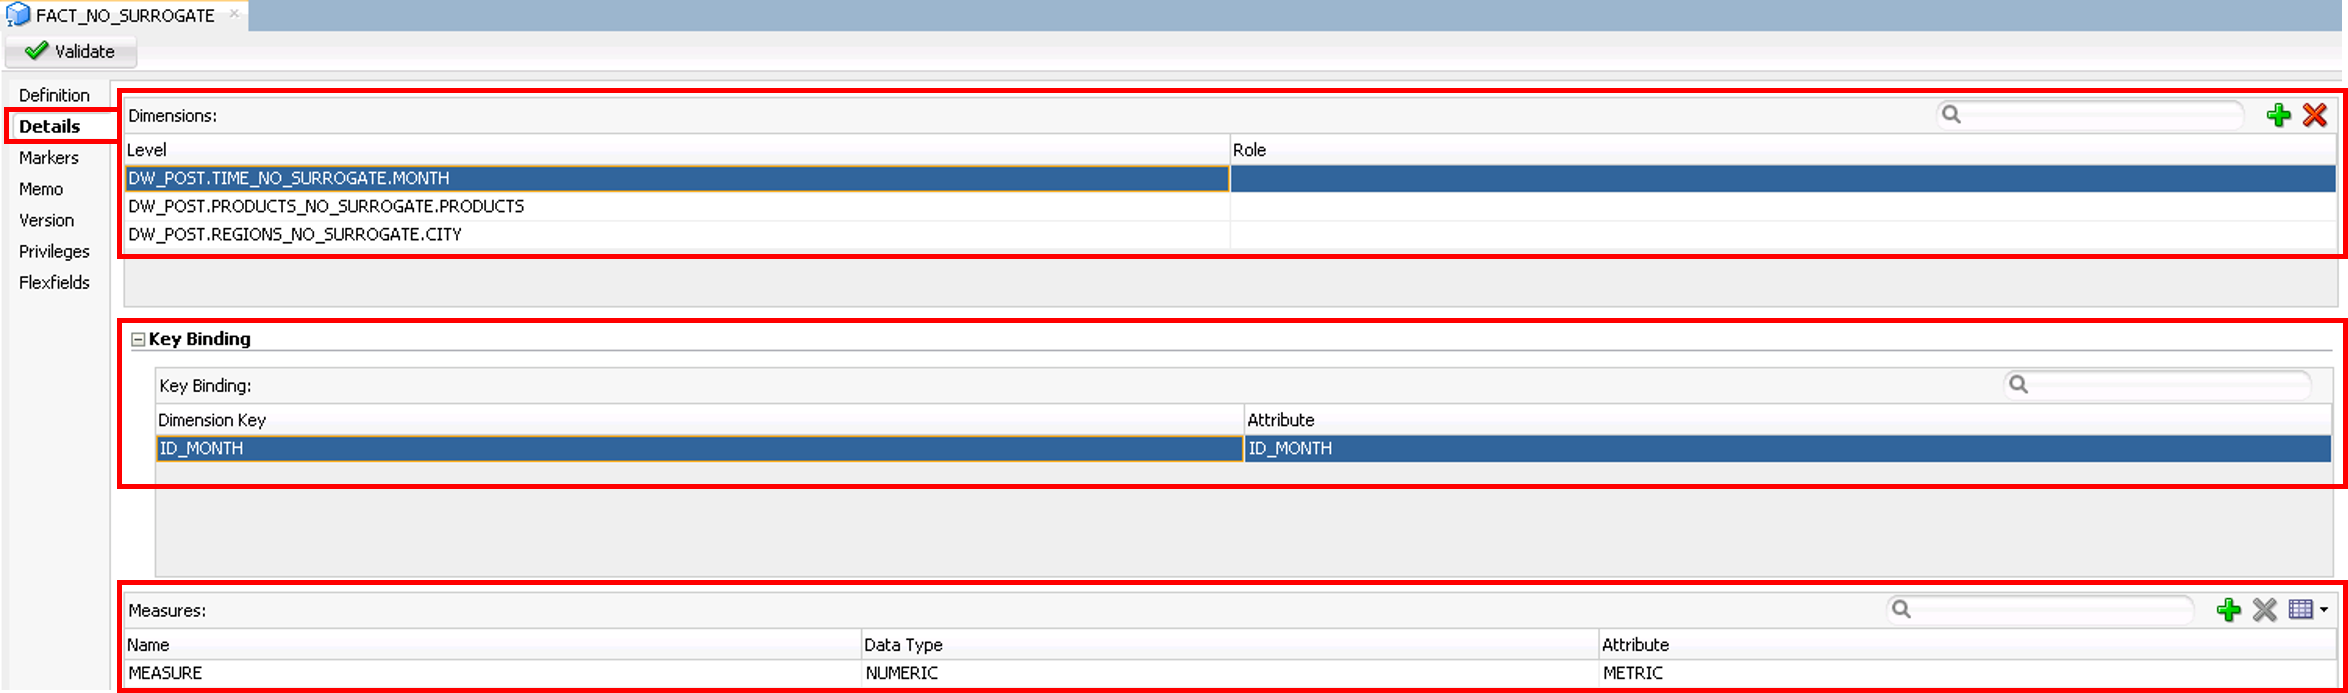
The KM usage is very similar to the old ones and we had the instructions in all its options so we’ll not explain then here (just in the article). The only important difference is on how to setup the “Cluster (Data Server)” information on Data Server (Physical Architecture). For the new HFM API, we need to inform two new settings: Oracle Home and Oracle Instance Paths. Those paths are related to the server where your HFM application is installed. These settings will be used internally in HFM API to figure out all HFM information related to that specific HFM instance.

Due to these two new settings and in order to continue to accommodate all connection information within a single place (ODI Topology), “Cluster (Data Server)” was overloaded to receive three settings instead of just one, separating them by colon. So now “Cluster (Data Server)” receives “dataServerName:oracleHomePath:oracleInstancePath” instead of just dataServerName.

data-server

Having those considerations in mind, it is just a matter to create a new Data Server and set the overloaded “Cluster (Data Server)” information and the user/password that ODI will use to access the HFM application. After that, we just need to create a Physical Schema with the name of the HFM application, a new Logical Schema and associate that to a context.

And that is it, you guys are ready to upgrade your HFM environment and still use your old ODI interface to maintain HFM. If you guys have any doubts/suggestions about the KMs please few free to contact us.

If you guys are having errors with our KMs, please check our troubleshooting post here.

I hope you guys enjoy these KMs. See you soon!

OTN Article: Building a 100% Cloud Solution with Oracle Data Integrator

Posted in ACE, ArchBeat, BICS, DBCS, DEVEPM, EPM, EPM Automate, InfraStructure, ODI, ODI 11g, ODI Architecture, Oracle, Oracle Database, OS Command, OTN, PBCS, Tips and Tricks with tags , , , , , , , , , , , , on January 23, 2017 by RZGiampaoli

Hi guys how are you? Today I want to share our new OTN article Building a 100% Cloud Solution with Oracle Data Integrator.
The article will cover how to integrate BICS, PBCS, DBCS and ODI and will explain step by step how to create a 100% cloud solution using ODI (everything on the cloud including ODI :)).

This is a perfect article for companies that are thinking to go cloud and have some doubts or even are thinking how you can integrate/use your actual infrastructure with the cloud services.

I hope you guys enjoy and see you soon.

ODI 12c new features: Dimension and Cubes! Part 1 (Settings)…

Posted in ACE, Configuration, Cubes, Dimensions, ETL, New Features, ODI, ODI 12c, ODI Architecture, ODI Mapping, Tips and Tricks with tags , , , , , , , , on August 19, 2016 by RZGiampaoli

Today we’ll talk a little bit about the new feature introduced in ODI 12.2.1.1.0, Dimension and Cubes!

As everybody already know, Oracle is slowly merging OWB within ODI and in each release we can see a new feature from OWB arriving in ODI. This time were the Dimension and Cubes feature.

This feature helps you to create a DW based in a configuration that you do. Basically there is a new component in ODI that helps you to define the datastore to be mapped. Also, after you create all dimensions (that is the most time consuming part in the process), the cube or fact table creation and mapping is a lot easier than do it manually.

Right now there is just one type of dimension available (Star schema level based dimension), but in the future other kinds will be supported like snow flake and others.

Ok, let’s start. There’re two ways to build a star dimension in ODI: with natural key’s (where the natural key is stored in the FACT table) and with surrogate keys (where the surrogate key is stored in the FACT table). In this post we’ll cover how we create a DW using the natural key process since the surrogate key one is buggy (the interface fails on saving the surrogate key) and we have openned a SR with Oracle to get it fixed. As soon we have the fix we’ll cover that too here in the blog.

In the Designer tab we can now see that we have a new tab called Dimensions and Cubes.

1-Dimension and Cubes

Opening that tab you will find a blank area, you need to click the button in the “Dimension and Cubes” tab, and you can create a new DM or DW.

2-DW creation

By the way, here’s the first small bug. For some reason when you write the name you want, ODI does not fill automatically the code field (as it always do for all the other objects in ODI), then you need to manually insert a code there. Remember, no spaces and no special character.

After that we can expand it and see the Dimension and the Cube node.

3-DW creation

Right click on those and we can create a new Dimension or Cube. As everybody knows, the dimension comes first since we need them to maintain the data integrity of the cube.

4-Dimension Definition

Here you can give any name you want for the dimension. Also you have a Pattern Name (that has just one option by now) and in the side tabs we have all possible options for the Dimension, Levels and Hierarchies, that we’ll cover later.

There are two more option here: the Datastore, that is the target dimension datastore where all metadata will flow and the Surrogate key Sequence that you need to set in case you want to create a dim using surrogate key (We’ll cover this later since we have a bug here).

In our case we’ll have three dimensions and one cube. (Time, Products, Regions and Fact). Both the source and the targets tables were generated by me with dummy data, just for this post. If you want to replicate this example, the scripts are here:

No surrogate Script

Let’s create the Time dimension. Click in the “Levels” in the left side tabs and you will see a big screen in three big sessions: Levels, Levels Attributes and Parent Level References.

5-Level Canvas

Let’s begin with the level configuration. Clicking in the Plus Sign button will create a Level.

6-Level Creation

I always like to rename the Level to something more meaningful like “Year” but if you like you can keep as default. By the default the target datastore comes automatically mapped since you define it in the previous screen. The only thing left here is to define the “Staging Datasore”.

This is something that we didn’t understood why it was made in this way since ODI could create automatically based in the definitions we had in the previous step or even with the interface configuration.

Anyway, what we need to do is create the stage tables for each level, and for that we have a few approaches we can do here:

  1. We can create another table exactly in the same way of the target table (needs to be a new table because the way ODI integrates the data. We’ll cover that latter).
  2. We can create, in this case, 3 tables, one for Year (same way as the source table is), and one for Quarter (same way of the source plus all columns from the Year table) and one for Month (same way of the source plus Quarter and Year columns).
  3. And we can duplicate the sources or the target datastore and do the changes above (in the 2 approach).

With the Stage datastores created (manually or by reverse) we just need to click in the “…” button and choose it from the list. Now we just need to repeat the step 2 more times for the other levels:

7-Level Canvas mapps

After we associate the source datastores and the stage datastores it’s time to create the attributes and ID’s for each level. For this you just need to click in the Year level and click in the Plus Sign button below:

8-Level attibutes config

Here we need to create all the attributes for this level and the natural key for that level as well. (We have the option to create slowly change dimensions here, but this will be covered in a future post!)

For each attribute you need to Plus Sign and fill the name of the attribute, set the data type (yes it not get automatically….) and select the Stage attribute (click in the “…” button and select it).

After all Attributes and ID’s we need to click in the below Plus Sign to set the natural key of that level. Just select in the list available.

After that, we just need to repeat for all the other 2 levels that we’ll have in this dimension.

With this done, the last step for this tab is to create the relationship between one level and its parent level. For this, highlight each level again, in this case we’ll start from bottom up, then let’s start clicking in the Month level and click on Plus Sign button below. Here we just need to say that for the Month level his reference parent will be Quarter. To set this we just need to select the Quarter level from the drop box and select eh foreign key from the drop box as well. Do that again for the Quarter level and reference it to the Year level. We don’t need to create any reference for the Year since it has no parent.

9 Parent Level References

As you can see, after the level configuration, everything you need to do is click in buttons and select from drop box or from “…” Screen (other than rename the defaults values if you like).
For last but not least, we need to click in the tab Hierarchies on the left tabs to enable us create a new hierarchy.

This is something fun. We can create multiple hierarchies inside the target table as well as skip level and some other features that we’ll cover in another post. For now let’s stay with a single hierarchy.

10-hierarchy

Here we need just to create the hierarchy by clicking in the Plus Sign button, give a name for the hierarchy and then click in the plus button bellow and add all the levels for the hierarchy. The order doesn’t matter, the idea here is that you can have multiple hierarchies with different levels in each one. For example, we could have a hierarchy called Full_Time with Year->Quarter->Month and another Hierarchy called Small_Time with just Year->Month. ODI would know based in the configurations we did, how to handle the data. Nice.

Also we can set skip level for each level we defined.

We are done with the dimension settings. I know it’s a lot of settings and some of you could be thinking (as we thought, this is a lot more work than if I create manually), but believe me, after you get used, you can do it in a reasonable time and the cube part is worthy.

Now we just need to repeat the process for all the other 2 dimension and them we finally start the cube settings:

11-Cube

To start the same thing as the dimension, Right click in the Cubes node and new.

12-Cube definition

In this screen we need to give a name for the cube, select a pattern name (Same as Dimension, just one option here for now) and do a biding to the target datastore.
After that we just need to click in the Detail tab in the left menu and start to configure our fact table.

12-Cube config

As I said in the beginning, here’s where the use of this components pays off. To configure a cube we just need click in the Plus Sign button and add all dimension we have, in this case our three dimensions. Then we just need to select the level we want to join our Fact table with our dimensions and bind the keys from the fact and that dimension.

For the last but not the least we just need to create by Plus Sign the measures that the Fact table will have. Same as the attributes in the dimensions: Name of the measure, Datatype and the column that will receive the data.

And that’s it. We are all set to move to the Mappings. Since this is already a huge post, I’ll stop this one now and will start a new post just for the Mappings, since I want to analyze how ODI builds the queries and loads the data there.

Hope you guys enjoy this post and see you soon.

Let’s Join DEVEPM @ KSCOPE 16

Posted in ACE, EPM, Essbase, ETL, Hyperion Essbase, Hyperion Planning, InfraStructure, Kscope 16, ODI, ODI 10g, ODI 11g, ODI 12c, ODI Architecture, ODTUG, Oracle Database, OS Command, Performance, Tips and Tricks with tags , , , , , , , , , , , , on April 5, 2016 by RZGiampaoli

Hi Guys how are you?

Just a quickly post about this year KSCOPE. This year we’ll have 2 excellent sessions:

Take a Peek at Dell’s Smart EPM Global Environment:

Ricardo Giampaoli , TeraCorp

Co-presenter(s): Rodrigo Radtke de Souza, Dell

When: Jun 27, 2016, Session 2, 10:15 am – 11:15 am

Topic: EPM Applications – Subtopic: Planning

In a fast-moving business environment, finance leaders are successfully leveraging technology advancements to transform their finance organizations and generate value for the business.
Oracle’s Enterprise Performance Management (EPM) applications are an integrated, modular suite that supports a broad range of strategic and financial performance management tools that help business to unlock their potential.

Dell’s global financial environment contains over 10,000 users around the world and relies on a range of EPM tools such as Hyperion Planning, Essbase, Smart View, DRM, and ODI to meet its needs.

This session shows the complexity of this environment, describing all relationships between those tools, the techniques used to maintain such a large environment in sync, and meeting the most varied needs from the different business and laws around the world to create a complete and powerful business decision engine that takes Dell to the next level. 

Incredible ODI Tips to Work with Hyperion Tools

Ricardo Giampaoli , TeraCorp

Co-presenter(s): Rodrigo Radtke de Souza, Dell

When: Jun 27, 2016, Session 6, 4:30 pm – 5:30 pm

Topic: EPM Platform – Subtopic: EPM Data Integration

ODI is an incredible and flexible development tool that goes beyond simple data integration. But most of its development power comes from outside-the-box ideas.

  • Did you ever want to dynamically run any number of “OS” commands using a single ODI component?
  • Did you ever want to have only one data store and loop different sources without the need of different ODI contexts?
  • Did you ever want to have only one interface and loop any number of ODI objects with a lot of control?
  • Did you ever need to have a “third command tab” in your procedures or KMs to improve ODI powers?
  • Do you still use an old version of ODI and miss a way to know the values of the variables in a scenario execution?
  • Did you know ODI has four “substitution tags”? And do you know how useful they are?
  • Do you use “dynamic variables” and know how powerful they can be?
  • Do you know how to have control over you ODI priority jobs automatically (stop, start, and restart scenarios)?

If you want to know the answer to all this questions, please join us in this session to learn the special secrets of ODI that will take your development skills to the next level.

Join us in KSCOPE 16 and book our 2 sessions in schedule. They will be very good sessions and I’m sure that you’ll learn some new stuff that will help you in your EPM Environment!

SpeakerSquare (1)

Remotely Ziping files with ODI

Posted in 11.1.1.9.0, ACE, Configuration, EPM, Essbase, ETL, Hacking, Hyperion Essbase, InfraStructure, ODI, ODI 10g, ODI 11g, ODI 12c, ODI Architecture, ODI Architecture, OS Command, Performance, Remotely, Tips and Tricks, Zip Files with tags , , , , , , , , , , , on April 5, 2016 by RZGiampaoli

Hi guys how are you? It has been a long time since last time I wrote something but it was for a good reason! We were working in our two Kscope sessions! Yes, this year we will have 2 sessions and I think they will be great!

Anyway, let us get to the point!

Today I want to talk about something that should be very simple to do it but in the end, it is a nightmare…. Zip a file in a remote server…

A little bit of context! I was working in a backup interface for one client and, because their cubes are very big, I was trying to improve the performance as much as I can.

Part of the backup was to copy the .ind and .pag files and the data extract files as well. For an app we are talking in 30 gb of .pag and 40 gb of data extract files.

Their ODI infrastructure is like this:

Infrastructure

Basically I need to extract/copy data from Essbase server to the disaster recovery server (DR Server). Nothing special here. The problem is, because the size of the files I wanted to Zip the files first and then send it to the DR server.

If you use the ODI tools to Zip the file, what it does is bring all the files to the ODI Agent server, zip everything and the send it back. I really do not want all this traffic in the network and all the time lost in this process (also, the agent server is a LOT less powerful then the Essbase server).

Regular odi tools zip process

Then I start to research how I could do that (and thank you my colleague and friend Luis Fernando Cairo that help me a lot doing a lot of tests on this)

First of all we have three main options here:

  1. Create a .bat file and run it remotely: I did not like it because I do not want a lot of .bats all over the places
  2. Use windows invoke command: I need a program in the server like 7 zip or so and I don’t have access to install freely and I do not want to install zip’s program all over the places too
  3. Use Psexec to execute a program in the server: Same as the previous one.

Ok, I figure out that in the end I’ll need to create/install something in the server… and I rate it. Well, let’s at least optimize the problem right!

Then I was thinking, what I have in common in all Hyperion servers? The answer is JAVA.

Then I thought, I can use the JAR command to zip a file:

jar cfM file.zip *.pag *.ind

Where:

c: Creates a new archive file named jarfile (if f is specified) or to standard output (if f and jarfile are omitted). Add to it the files and directories specified by inputfiles.

f: Specifies the file jarfile to be created (c), updated (u), extracted (x), indexed (i), or viewed (t). The -f option and filename jarfile are a pair — if present, they must both appear. Omitting f and jarfile accepts a “jar file” from standard input (for x and t) or sends the “jar file” to standard output (for c and u).

M: Do not create a manifest file entry (for c and u), or delete a manifest file entry if one exists (for u).

Humm, things start to looks better. Now I had to decide if I would use the Invoke command or Psexec.

I started trying the Invoke command, but after sometime I figure out that I can’t execute the jar command using invoke.

Then my last alternative was Psexec.

The good thing about it is that is a zip file that you need just to unzip in the agent server, set it in the Environment Variables (PATH) and you are good to go.

It works amazingly.

You can run anything remotely with this and it’s a centralized solution and non-invasive as well (what I liked).

You just need to:

psexec \\Server  -accepteula  -w “work dir” javapath\jar cfM file.zip *.pag *.ind

Where:

-w: Set the working directory of the process (relative to remote computer).

-accepteula: This flag suppresses the display of the license dialog.

There’s one catch, for some unknown reason, the ODI agent does not get the PATH correctly then you need to use the complete path where it was “Installed”. The ODI is like this:

OdiOSCommand “-OUT_FILE=Log_Path/Zip_App_Files-RUM-PNL.Log” “-ERR_FILE =Log_Path /Zip_App_Files-RUM-PNL.err”

D:\Oracle\PSTools\psexec \\server -accepteula -w \\arborpath\APP\RUM\PNL\ JAVA_PATH\jdk160_35\bin\jar cfM App_Files-RUM-PNL.zip *.pag *.ind

With this, we will have a process like this:

Remotly Zip Process

This should not be something that complicate but it is and believe me, I create a very fast process and the client is very happy.

I hope you guys enjoy it and see you soon.

Article “Unleashing Hyperion Planning Security Using ODI” was published in OTN

Posted in Hyperion Planning, ODI, Configuration, Security with tags , , , , , , , , , , , , , on July 16, 2015 by RZGiampaoli

Hi guys!

OTN just published a new article from devepm entitled “Unleashing Hyperion Planning Security Using ODI”.

This article is all about Planning security and how you can use ODI to create cell level security based in anything you like (in our case is Attribute Dimension).

This is a study case and it’s in production for 3 years right now.

Please take a look and let us know your thoughts.

Thank you and see you soon.