Archive for the New Features Category

ODICS is here!!!

Posted in New Features, ODI, ODI Architecture, ODICS with tags , , on February 13, 2017 by Rodrigo Radtke de Souza

Hi all, quick but interesting post today! Oracle has just announced its Oracle Data Integrator Cloud Service (ODICS)! You may read about it here and here. We do not have much information about it yet (if it is a complete ODI solution, how it works, if it is similar to what we did in our ODI Cloud article), but we are hoping to get those answers in “Oracle Data Integration PM Webcast – Introducing Oracle Data Integrator Cloud Service (ODICS)” that will happen on Thursday, February 16, 2017 | 11:00 am Eastern Standard Time (GMT-05:00). We encourage all of you to join the webcast and have a first look on what ODICS looks like.

——- EDIT on Feb 23 ——-

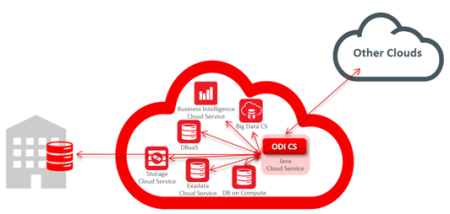
Hi all, we’ve watched the ODICS webinar and in the end we were right: ODICS is very similar to what we did on our ODI Cloud article. The only difference is that ODICS is installed directly in JCS instead of a DBCS machine as we did in the article.

In resume, ODICS is nothing more, nothing less than the current ODI 12c installed in a JCS machine that is maintained by Oracle. There is only one restriction (that may not be a big issue for some projects), that the ODI agent needs to be running in the cloud, so you may not deploy it on premise. You may watch Oracle’s ODICS webinar here. You may also know more about ODICS at Christophe blog post.


odics

That’s it folks, exciting times are ahead of us!

ODI 12c new features: Dimension and Cubes! Part 2 (Loading using Natural Keys)

Posted in Cubes, Dimensions, ETL, New Features, ODI 12c, ODI Architecture with tags , , , , , on September 14, 2016 by Rodrigo Radtke de Souza

Hi all, let’s continue with our posts regarding “ODI 12c new features: Dimension and Cubes”. As stated in the previous post, we can have two ways to build our new objects: with natural keys or with surrogate keys. Today’s post will focus on loading the dimensions and fact tables that where created using natural keys (please see our previous post for all the settings required for those objects).

Let’s begin loading our TIME dimension (which was mapped to our TIME Oracle table). This dimension will have information from three different source tables: SRC_YEAR, SRC_QUARTER and SRC_MONTH. Each of them has information regarding each TIME hierarchy level, so all of them needs to be loaded in order to have a complete hierarchy in our final table.

The load process is very easy and intuitive: first create a new mapping and drag and drop the TIME dimension to it. Then, just add the three source tables, map to its correspondent level in the TIME dimension and that’s it. A very cool thing here is that ODI understands each level as a “separate” table/process, so you don’t need to join your source tables before actually loading it to the target dimension. In other words, ODI allows you to have any kind of complex ETL to each dimension level and each level will be treated as “separate” data loads that will be glued together by the hierarchy setting that you mapped in the TIME dimension object. Here is what it looks like:

blog1

blog2

blog3

blog4

When you execute the mapping we are going to see that the first “MAP_BEGIN” section will try to create and truncate our stage tables that were set in our dimension object. Here is an odd thing (as we also mentioned in the last post): We could not understand yet why ODI “forces” you to have the stage tables created prior to execution (so you can select them in the Dimension object), as it could very well create them for you (like it does for C$ and I$ tables). I know that Oracle may had a reason behind it, but as for now, the entire “stage tables” thing seems an unnecessary setup. Anyway, the important thing here is that ODI will truncate the stage tables before any new execution.

blog5

In the “MAP_MAIN” section is where it gets interesting. We can see here how ODI threats this new dimension object: each level has its own ETL, as we can see that it is loading YEAR, QUARTER and MONTH separately. First YEAR step will load its source to its stage table STG_YEAR, then QUARTER step will join the information from its source table plus STG_YEAR to its STG_QUARTER table. Finally, MONTH step, that is our leaf/grain level, will join its source table plus STG_QUARTER table (which is already joined with YEAR source) and merge it all together in our final table TIME. The result will look like below:

blog6

Since we are not using Surrogate keys here, our Dimension table will contain only the grain/leaf members with all Natural Keys and its attributes for all levels that exists in the dimension. So one row will contain all information regarding all levels that it belongs to. When we create the mappings for the other two dimensions (they’re very similar, so I’m not adding them here) and execute them, we will get the following results:

blog7

blog8

Let’s to go our Fact table load. This one is way too simple, since our source table already contains all the Natural Keys that will be the ones that will also exist in our FACT table (remember, we are not dealing with Surrogate Keys in this example). Here we just need to map each NK to its respective dimension column and also our Measure data and execute the mapping.

blog9

blog10

When we take a look in Operator, we are going to see a single merge command in our Fact table, where ODI will use all dimensions to search if that row already exists in our FACT table. If it exists, the measure column is update, otherwise it is inserted.

blog11

The final result is below: as expected, all Natural Keys from our dimensions were inserted in the Fact table, together with our measure.

blog12

Now you may be wondering, why should I use these new features if it seems a lot of work (settings) for a little gain? Well, using ODI for Natural Key’s only is really not worth it, since the only benefit here seems to be ODI loading the dimensions levels all at once, with different sources/ETL, in a single mapping object, which is a very cool feature, since it enables us to better organize our DW objects and have a clear view on our ETL logic. But again, this is too little for the amount of work that we need to do to get there. But don’t worry, it will get way better when we start to work with Surrogate Keys, since ODI will be able to abstract all the Surrogate Key management and you will start to feel that all the necessary settings will finally be worth the work.

That’s it for today folks! We will be releasing the Surrogate Key settings and load posts very soon, so stay tuned in our blog! See ya!

ODI 12c new features: Dimension and Cubes! Part 1 (Settings)…

Posted in ACE, Configuration, Cubes, Dimensions, ETL, New Features, ODI, ODI 12c, ODI Architecture, ODI Mapping, Tips and Tricks with tags , , , , , , , , on August 19, 2016 by RZGiampaoli

Today we’ll talk a little bit about the new feature introduced in ODI 12.2.1.1.0, Dimension and Cubes!

As everybody already know, Oracle is slowly merging OWB within ODI and in each release we can see a new feature from OWB arriving in ODI. This time were the Dimension and Cubes feature.

This feature helps you to create a DW based in a configuration that you do. Basically there is a new component in ODI that helps you to define the datastore to be mapped. Also, after you create all dimensions (that is the most time consuming part in the process), the cube or fact table creation and mapping is a lot easier than do it manually.

Right now there is just one type of dimension available (Star schema level based dimension), but in the future other kinds will be supported like snow flake and others.

Ok, let’s start. There’re two ways to build a star dimension in ODI: with natural key’s (where the natural key is stored in the FACT table) and with surrogate keys (where the surrogate key is stored in the FACT table). In this post we’ll cover how we create a DW using the natural key process since the surrogate key one is buggy (the interface fails on saving the surrogate key) and we have openned a SR with Oracle to get it fixed. As soon we have the fix we’ll cover that too here in the blog.

In the Designer tab we can now see that we have a new tab called Dimensions and Cubes.

1-Dimension and Cubes

Opening that tab you will find a blank area, you need to click the button in the “Dimension and Cubes” tab, and you can create a new DM or DW.

2-DW creation

By the way, here’s the first small bug. For some reason when you write the name you want, ODI does not fill automatically the code field (as it always do for all the other objects in ODI), then you need to manually insert a code there. Remember, no spaces and no special character.

After that we can expand it and see the Dimension and the Cube node.

3-DW creation

Right click on those and we can create a new Dimension or Cube. As everybody knows, the dimension comes first since we need them to maintain the data integrity of the cube.

4-Dimension Definition

Here you can give any name you want for the dimension. Also you have a Pattern Name (that has just one option by now) and in the side tabs we have all possible options for the Dimension, Levels and Hierarchies, that we’ll cover later.

There are two more option here: the Datastore, that is the target dimension datastore where all metadata will flow and the Surrogate key Sequence that you need to set in case you want to create a dim using surrogate key (We’ll cover this later since we have a bug here).

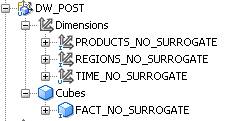
In our case we’ll have three dimensions and one cube. (Time, Products, Regions and Fact). Both the source and the targets tables were generated by me with dummy data, just for this post. If you want to replicate this example, the scripts are here:

No surrogate Script

Let’s create the Time dimension. Click in the “Levels” in the left side tabs and you will see a big screen in three big sessions: Levels, Levels Attributes and Parent Level References.

5-Level Canvas

Let’s begin with the level configuration. Clicking in the Plus Sign button will create a Level.

6-Level Creation

I always like to rename the Level to something more meaningful like “Year” but if you like you can keep as default. By the default the target datastore comes automatically mapped since you define it in the previous screen. The only thing left here is to define the “Staging Datasore”.

This is something that we didn’t understood why it was made in this way since ODI could create automatically based in the definitions we had in the previous step or even with the interface configuration.

Anyway, what we need to do is create the stage tables for each level, and for that we have a few approaches we can do here:

  1. We can create another table exactly in the same way of the target table (needs to be a new table because the way ODI integrates the data. We’ll cover that latter).
  2. We can create, in this case, 3 tables, one for Year (same way as the source table is), and one for Quarter (same way of the source plus all columns from the Year table) and one for Month (same way of the source plus Quarter and Year columns).
  3. And we can duplicate the sources or the target datastore and do the changes above (in the 2 approach).

With the Stage datastores created (manually or by reverse) we just need to click in the “…” button and choose it from the list. Now we just need to repeat the step 2 more times for the other levels:

7-Level Canvas mapps

After we associate the source datastores and the stage datastores it’s time to create the attributes and ID’s for each level. For this you just need to click in the Year level and click in the Plus Sign button below:

8-Level attibutes config

Here we need to create all the attributes for this level and the natural key for that level as well. (We have the option to create slowly change dimensions here, but this will be covered in a future post!)

For each attribute you need to Plus Sign and fill the name of the attribute, set the data type (yes it not get automatically….) and select the Stage attribute (click in the “…” button and select it).

After all Attributes and ID’s we need to click in the below Plus Sign to set the natural key of that level. Just select in the list available.

After that, we just need to repeat for all the other 2 levels that we’ll have in this dimension.

With this done, the last step for this tab is to create the relationship between one level and its parent level. For this, highlight each level again, in this case we’ll start from bottom up, then let’s start clicking in the Month level and click on Plus Sign button below. Here we just need to say that for the Month level his reference parent will be Quarter. To set this we just need to select the Quarter level from the drop box and select eh foreign key from the drop box as well. Do that again for the Quarter level and reference it to the Year level. We don’t need to create any reference for the Year since it has no parent.

9 Parent Level References

As you can see, after the level configuration, everything you need to do is click in buttons and select from drop box or from “…” Screen (other than rename the defaults values if you like).
For last but not least, we need to click in the tab Hierarchies on the left tabs to enable us create a new hierarchy.

This is something fun. We can create multiple hierarchies inside the target table as well as skip level and some other features that we’ll cover in another post. For now let’s stay with a single hierarchy.

10-hierarchy

Here we need just to create the hierarchy by clicking in the Plus Sign button, give a name for the hierarchy and then click in the plus button bellow and add all the levels for the hierarchy. The order doesn’t matter, the idea here is that you can have multiple hierarchies with different levels in each one. For example, we could have a hierarchy called Full_Time with Year->Quarter->Month and another Hierarchy called Small_Time with just Year->Month. ODI would know based in the configurations we did, how to handle the data. Nice.

Also we can set skip level for each level we defined.

We are done with the dimension settings. I know it’s a lot of settings and some of you could be thinking (as we thought, this is a lot more work than if I create manually), but believe me, after you get used, you can do it in a reasonable time and the cube part is worthy.

Now we just need to repeat the process for all the other 2 dimension and them we finally start the cube settings:

11-Cube

To start the same thing as the dimension, Right click in the Cubes node and new.

12-Cube definition

In this screen we need to give a name for the cube, select a pattern name (Same as Dimension, just one option here for now) and do a biding to the target datastore.
After that we just need to click in the Detail tab in the left menu and start to configure our fact table.

12-Cube config

As I said in the beginning, here’s where the use of this components pays off. To configure a cube we just need click in the Plus Sign button and add all dimension we have, in this case our three dimensions. Then we just need to select the level we want to join our Fact table with our dimensions and bind the keys from the fact and that dimension.

For the last but not the least we just need to create by Plus Sign the measures that the Fact table will have. Same as the attributes in the dimensions: Name of the measure, Datatype and the column that will receive the data.

And that’s it. We are all set to move to the Mappings. Since this is already a huge post, I’ll stop this one now and will start a new post just for the Mappings, since I want to analyze how ODI builds the queries and loads the data there.

Hope you guys enjoy this post and see you soon.

Using templates to create dynamic rules in Calcmanager 11.1.2.4

Posted in 11.1.2.4, ACE, BSO, Business Rules, CalcScript, Calculation Manager, Calculation Script, EPM, Essbase, Hacking, Hyperion Essbase, Hyperion Planning, New Features, Oracle, Performance, Templates, Tips and Tricks with tags , , , , , , , , , , , on January 1, 2016 by RZGiampaoli

Hi guys and happy new year!!!

And to start well the new year what’s best then a post?

Today I want to talk about the new version of Calculation manager (11.1.2.4). I know that it is out for a while now but still I think it has some cool features that are not explored.

In all Planning project, sooner or later, we come to a time that we need to create a currency conversion Rule (at least I like to create a custom Rule for performance reasons). Also some companies uses a lot of currencies.

Before continue I need to say that in our case I find out that less code is equal a less performance. What I mean by that is that for the forecast horizon range period for example, instead of use “IF” and test my 15/18 months horizon I triplicate the code using “FIX” and using “SET EMPTYMEMBERSETS ON ;”.

This set command ignores the “FIX” if it returns an empty set. This approach increases the performance a lot, some times more than 8 times (In this currency example, if I ran it at channel level with “IF”, toke 8 hours, with “FIX” takes 1 hours).

Ok that means I rarely use “IF” in my Rules.

Well, you can already imagine the size and row boring and prone error is the Rules if I use only “FIX” right? However, with the “Template” feature in calcmanager and the ability to call any template or rule using a script this nightmare turns in to a dream!

Let us see how it works!

A Currency conversion for forecast applications normally has two parts:

First parts is a period range part.

Second part is the currency conversion itself.

With calcmanager, we can create two template, one for the period and the other for call the currency conversion part.

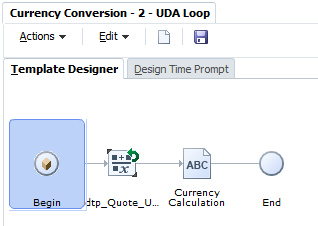
Then for the Currency conversion calculation, I create a simple core template with just a formula and a script on it:

UDA Loop Template

The “dtp_Quote_UDA”  is a DTP (design time prompt) variable with a function that will insert double quotes in every value that comes from the “dtp_UDA” DTP variable (this will be used to get values from the outside template), this way we can have use just one variable to do two papers, currency name and UDA value. The code is:

@QUOTE([dtp_UDA])

The inside the Currency calculation script we will have:

Currency Script

As we can see inside the script, I used the “dtp_Quote_UDA” as well the “dtp_UDA”. This simplify the amount of parameters I need to pass and the maintenance as well. Let’s think, we need the same information, one with double quotes, for the UDA values and other without quotes, for the Rate name.

With this technic we need to pass just once the value, let’s say BRL, and in the code Calcmanager will replace before the execution in all places, and we’ll have @UDA(Entity,”BRL”) as well HSP_Rate_BRL.

This is awesome because now I have just 8 line of code that will be transformed in any amount of times I want. The best thing is, or everything is right or everything is wrong J

Because calcmanger now we have a layer between the code written and the code generated, and this is pretty cool because opens a huge windows for creativity. You can even generate the entire code dynamically.

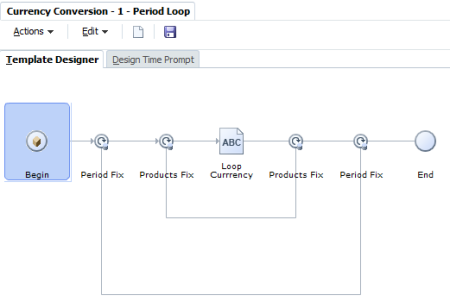
Ok, the next step is to loop this template once for each currency we have. For this, I created another template. This one will be used for the Forecast horizon period range as well for loop the currencies.

Period loop template

Again, the code is pretty simple, just  two fixes and one script.

For the “Period FIX” we use two DTP variable to get the value of Year and period from the outside rule ([dtp_Period] and [dtp_Year]).

The product fix is just something related with our architecture and we do not need to bother about it.

Now the “Loop Currency” is a script that will call N number of times our first template. How can we do that with a script?

Basically every time you drag and drop a template inside a rule or to another template behind the graphic design calcmanager generate a command line. This code exists thanks to its API, and you can use it to manipulate and generate almost any kind of code inside calcmanger.

Currency loop template

As we can see, inside the script we have a “Fix” for the USD currency, (that is the only different conversion) and one row for each currency.

Each row is calling a template “%Template(name:=Currency Conversion – 2 – UDA Loop” from an application “application:=”WWOPS””, a plan type, “plantype:=”Pnl””, and is passing two DTS values, one for the UDA and other for the Entity, “dtps:=(“dtp_UDA”:=[[AED]],”dtp_Entity:=[[dtp_Entity]])”.

As you can see, you can pass a DTP variable using the variable itself (dtp_Entity:=[[dtp_Entity]]).

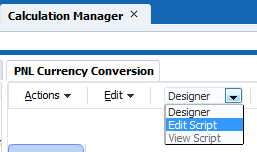
If you want to create this API code and don’t know how to write the right syntax you can just drag your template to a rule/template, set everything and change your view to “Edit Script” or “View Script”.

Edit script

Now we just need to create the rule that will call this template for the three range of periods we have:

Currency rule

Again a simple design with a small amount of components. Here we have our SET commands, a main fix and the three templates, each one calling the previous template for a different period of range.

Period Range

The final result is a Rule with 1213 rows generated from a 8 rows template. This is the magic of calcmanager and templates. You can simplify everything, you can create dynamic aggregations, that will change depending of the application and cube, you can create codes that changes depending of the member that is coming from the forms, everything with small set of code that is reusable anytime we want!

Rule code 1Currency code 2

…….

A dynamic way to build a currency rule in calcmanager. A lot faster to build and a lot easier to maintain, since if a new currency start to be used you just need to copy and paste one line in “Currency Loop” script, change the currency and it’s done.

Build Rules using templates looks more work and some time a little bit complicate but I remember well how much time I expend changing BRs and I can guarantee that this way is much faster and easier to develop and mainly to maintain.

In the end we just create a Rule and two templates that contains just one core calculation, in my case a script calling 47 times this core, some fixes, and that’s all. It was less than 60 rows of written code to generate 1213 rows. Pretty good for me 🙂

Rules ante templates

Hope you guys enjoy and I wish a happy new year for all and you dears ones.

Happy new year!!!! A new year full of surprises!


ODI 12c First impressions

Posted in EPM, New Features, ODI 12c, ODI Architecture, ODI Architecture, ODI Mapping with tags , , , on October 26, 2013 by RZGiampaoli

When I started working with ODI it was in version 10, and back there we had a few bugs, the UI was good (back there we could change the expressions and we didn’t have to take out the focus to save the changes, for example) , everything worked well, we could write a variable name with upper or lower case, the metadata navigator worked very well and that was one of the things that made the users choose ODI instead of power center Informatica, because they had an easy way to run their interface at will, and some other good things. It was a very stable version of ODI, good times.

Then 11 version came out. Well, the first thing we noticed was the UI, and the huge amount of bugs that came with it, and most of them in the interface screen. In 11 version, if you try to delete a filter, all the other filters disappears, but they are still there, if you close and re-open the interface they’ll come back, if you change a expression and doesn’t remove the focus from the filed it’ll not commit the changes, if you delete a datastore and put a new one (because some model changed for example) you have a good chance to not be able to save the interface for some bizarre error and you need to do this operation over and over, the variables name must be upper case for some odd motive, and other things. Another big loss was the metadata navigator that was replaced by ODI Console, a worse version with so many bugs that we had to stop using it. Some bugs like lack of security (everybody could see everything), all the execution ran as supervisor, we couldn’t see the load plans (only place where the security works), we couldn’t see the variables and lots of other things.

BUT despite of that, the functionalities for the DEV team were almost the same.

Now we have a new version of ODI. The 12c. Ok, this is only our first impressions and we could have been doing something very wrong (and I pray for this). When a software changes its version and two specialists takes more than 30 minutes trying to figure out why and how or what they need to do to sum a column in an interface or should I say mapping (yes, this is the new name, I liked it and this is one of the few things that made sense to me in this new version), something is very wrong with it.

Ok let’s start from the beginning. When I started to work with datamart, the first tool that I used was OWB, and after some time when I started to use ODI to make some integration, I really missed some stuffs from OWB. It makes sense to get this two tools and merge it together. From OWB we had a cool mapping process that makes easy to understand what that transformation is doing, multiple targets, and a few other things that I missed in ODI, BUT, ODI has the Agent that allow us to connect anywhere without the need to create a heterogeneous service or a dblink or other stuff like that, it has more flexibility (and when I say more you can understand infinite more), we don’t need to deploy the mapping to create a procedure in a oracle database to integrate something, what makes the development test super-fast, we have a lot of components, well, ODI is so much better in this aspect that the few things I missed doesn’t bother me at all.

So in this new version they tried to merge the two tools. What looks good in the paper (I mean blogs and documentations) looks terrible in ODI.

We installed it this weekend to see what happened in this new version and we saw a very different workspace for the interface, I mean for the mappings. This simple ODI UI…
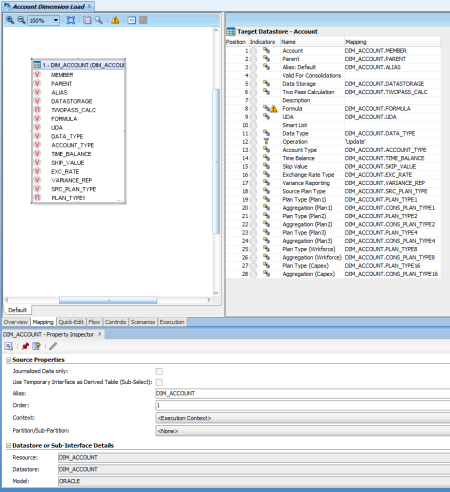
ODI 11g Interface UI

ODI 11g Interface UI

Turned into this:

ODI 12c Interface UI

ODI 12c Interface UI

Humm looks good right? Well, yes and no. I’m working in a 60” full screen TV and I need to drag the screen left and right, up and down to make everything visible, poor devs that has a screen smaller than mine.

Ok but this is only layout, everything else should be better right? Well, unless we were doing something very wrong they put a lot of more complexity to solve some issues that we were able to solve very quickly since version 10.

First of all, in all the other versions if you want to sum something in ODI you just need to get the expression in the target datastore and put a SUM() function on it. ODI would do the group by for you and everything is ok.

ODI 11g Sum

ODI 11g Sum

In the new version you need to drag an object called Aggregate, put all the columns that you want to map trough this (like in OWB), change the options of this object, and in the end, put the same SUM() expression in this object instead of in the target datastore.
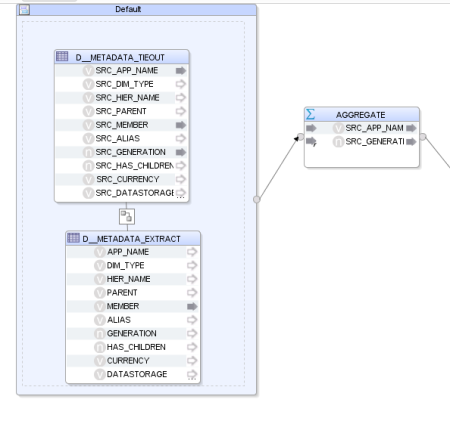
ODI 12c Sum Part 1

ODI 12c Sum Part 1

ODI 12c Sum Part 2

ODI 12c Sum Part 2

ODI 12c Sum Part 3

ODI 12c Sum Part 3

If you try to put the expression as before (<=11g) it’ll not create the group by and you’ll not be able to run the interface because it will just simply fail ….

Well, at least in OWB when you use the Aggregate object it’ll aggregate the columns that you define without the need to write the SUM() function. Why they put this new complexity? Ok you can execute this SUM() in another place different from the source or the target but still…

We have some other components that we need to use in the interface right now.

ODI 12c Mapping Components

ODI 12c Mapping Components

The dataset is used when you want more than one dataset in the source (we already have it in the 11g, the difference now is that you need more screen to manage it but the bright side is that you’ll not forget to change anything because you missed the datastore tab like in the old version [yes I did it a lot])

ODI 11g Datastore

ODI 11g Datastore

ODI 12c Datastore

ODI 12c Datastore

The distinct component does not need to be explained, the only thing I had to say is that in the old versions you need only to flag it in a simple check box and now we need to add a distinct component in the flow, drag all columns to it and them drag those columns again to the target. A complete waste of time.

ODI 11g distinct

ODI 11g distinct

ODI 12c Distinct

ODI 12c Distinct

The expression… well, almost the same as Aggregate. Now instead of just write any expression in the target datastore you may add this object in the flow, BUT it will work if you just write the expression on the target. So, why do we need to have this additional object???
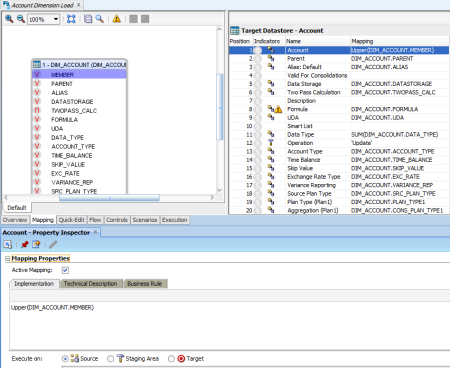
ODI 11g Expression

ODI 11g Expression

ODI 12c Expression

ODI 12c Expression

For the filter, join and lookup table nothing changed.

ODI 12c Lockup

ODI 12c Lockup

The set is to define the type of union you can have between the datasets, same as before but now it’s in the mapping too.
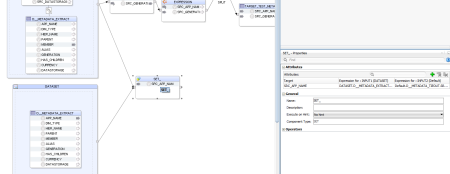
ODI 12c Set

ODI 12c Set

We now have a sort component, so now we may stop doing “SQL injection” or “KMs changes” for a simple order by component (of course I liked this one).
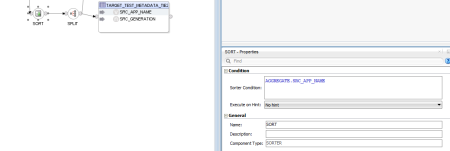
ODI 12c Sort

ODI 12c Sort

And the Split component. This one is what I missed the most in OWB. This allow us to say something like: if the DIMENSION is Account, all the data goes to DIM_ACCOUNT, DIMENSION =  ENTITY then DIM_ENTITY, the others goes to DIM_OTHERS for example.

This is a cool thing but easily done using our command on source and target in a procedure (See this post 10 Important Things to Improve ODI Integrations With Hyperion Planning Part 2).
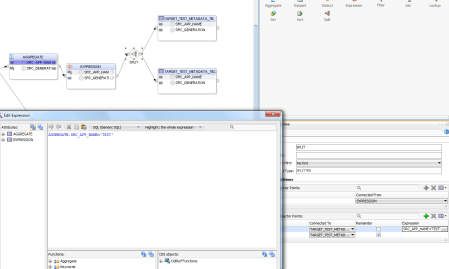
ODI 12c Split

ODI 12c Split

As we can see a lot of things were made for this version, but all this things makes it unusable. Really, in the old versions I already tried to not use interface, only if was absolute necessary, because they are time consuming, inflexible, hard to maintain and there’s nothing you can’t do in a procedure that is a lot better and faster to create then interfaces, in fact I only use interface when I want to use the CKM to use some constraints for data quality, nothing I can’t do in a procedure, but this is for sure something easier to achieve using interfaces. Despite of that, everything else I prefer to use a procedure, mainly because I can get rid of the models, that looks good, but for me they are the true villain of ODI. Models are hard coded information, and I hate hard code.

In resume, in this new version things that were relative simple to use, now are a nightmare to create. Of course that things will get more visual but the developers will pay a very high price for that cool looking. Oracle just added foolish complexity on things that were simple and that worked very well. Do you want a final example? On prior versions of ODI, you would import all KMs that you needed for that specific project and you would pick one of them from the combo box on the flow tab. If you needed to change it later, just pick another one from that same list and that’s it:

KMs 11g

ODI 11g KM Selection

On version 12, first you need to be on the Logical tab of the Mapping object, click on the target table to get its focus, expand “Target” properties on the right panel and select its target “Integration Type”. This type will filter which KMs you will be able to see in the Physical tab:

IntegrationType1

ODI 12c KM Selection 1

In the Physical tab, click again on the target table, expand “Integration Knowledge Module” and select one of the KMs of that type that you filtered in the previous tab:

IntegrationType2

ODI 12c KM Selection 2

And what happens if you want to change the KM? If it is from a different type, first you need to go to the Logical tab, change its type, go to Physical, and select another KM. Ok, they have categorized the KMs and this is a good thing but why they didn’t add the Integration Type in the same tab of the KM selector??? Now we need to go back and forth without any good aparent reason and if you are in doubt on which KM to select and you want to read their descriptions to see which one best fits your needs, then you are totally screwed.

But there are two really cool things about this 12c version. First one debugger! Finally they added a debugger to ODI! This feature was a long waited one because it was simply terrible to debug things in ODI. Now you can go execute the code step by step, take a look in the variables content for that session and you can even query uncommitted data through the transactions:

debug_odi

ODI 12c Debug

Second cool stuff: Roles in Security Module! Again, another long awaited simple feature that did not exist until now. Roles are similar to Groups where the security added to a Role is replicated to all users that belongs to that Role. This is great, because in the old days, Security configuration was madness with a lot of manual configuration. Finally now we will have a better Security framework to work on it.
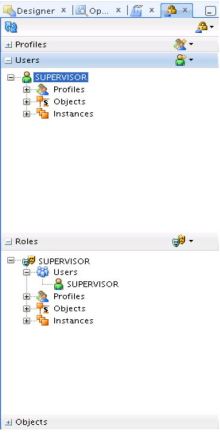
Roles_ODI

ODI 12c Roles

Well, there’s a lot of thing to see in this new version yet, but the first thing wasn’t pretty. I didn’t uninstall it yet. Let’s see if we can find anything good that justify this living hell that the interfaces (mappings) turned out to be.

If someone of you learn something different or get a different idea for this new version please let us know because I still don’t believe that these changes happened and this is the way Oracle wants us to work from now on. (By the way the UI for procedures are different too and for now I’ll not say if I liked it or not because normally we need some time to get used to it [but I didn’t like it J]).

This weekend we’ll try a migration and let our impressions here.

See you guys!