Archive for Planning

Oracle SQL for EPM Tips and Tricks S01EP09

Posted in ACE, Hyperion Planning, Oracle, Oracle Database, Performance, Tips and Tricks with tags , , , , , , on February 19, 2020 by RZGiampaoli

Hey Guys how are you?

Today it’ll be a quick tip for you guys that like/need to query the Planning repository.

The Planning repository stores both the Plan Type and the Consolidation in a very particular way, in fact this is true for a lot of other things like security, form properties etc… but I’ll focus these 2, that are the more often used and the solution is the same for all of them anyways.

If we take a look in the HSP_PLAN_TYPE table we’ll have something similar to this (depending in how many plan types you have in your app).

As we can see Planning stores in this table all the plan types that were created when we setup the application. In my case I have 4 plan types and we can have up to 5 BSO plan types in a Planning app. Now, if we join the HSP_OBJECT and the HSP_MEMBER filtering the OBJECT_TYPE = 2 we can take a look in all the dimensions we set in the repository.

The USED_IN columns is the column that says to planning in witch plan type that member will exists. The interesting thing here is that, you don’t see the PLAN_TYPE ID that you supposed to right? And that is because a member can exists in more than 1 plan type right, and if we use the PLAN_TYPE ID straight, we would need one row for each plan type right?

Instead, we have just one row but we also have the ability to tell Planning where that member should exists, and we can do that by summing the PLAN_TYPE ID’s together. In the example above, the Account dimension exists in all 4 plan types (1+2+4+8 = 15). Now the Products dimension exists only in one plan type (1), and by the number you can say that is the Pnl Plan type.

you seen the idea here is to check if a PLAN_TYPE ID exists inside that number we have here in the USED_IN column. Another example is the Employee dimension that has the USED_IN set as 8. The only number that will fit in here is the 8 itself (1+2+4 = 7, 1+8 = 9…) meaning the Plan type is WrkForce.

I think the most used way for us to figure out if a number exists inside another number is to use MOD.

  • CASE WHEN MOD(USED_IN,2)>=1 THEN 1 ELSE 0 END PT_1
  • CASE WHEN MOD(USED_IN,4)>=2 THEN 1 ELSE 0 END PT_2
  • CASE WHEN MOD(USED_IN,8)>=4 THEN 1 ELSE 0 END PT_3
  • CASE WHEN MOD(USED_IN,16)>=8 THEN 1 ELSE 0 END PT_4
  • CASE WHEN MOD(USED_IN,32)>=16 THEN 1 ELSE 0 END PT_5

The Oracle MOD(N,M) is used to return the remainder of a dividend divided by a divisor where:

NDividend.
MDivisor.
Pictorial Presentation of MOD() function

Then in our case, we need to test if the USED_IN number contains the PLAN_TYPE ID on it, and for that we need to MOD it by rolling sum of the plan types + 1. To make it easier I’ll put that in numbers:

  • N = USED_IN = 31 (max number possible)
  • M = PLAN_TYPE ID = 1 (Pnl) what I want to test) + 1 = 2
  • MODE (31, 2) = 1
  • 31/2 = 15 Reminder = 1
  • MOD = 1

What that is telling us is that if the MOD is = 1, the Plan type 1 exists in that number. I run a simulation just to show us when the Plan Type 1 does not exists in the USED_IN:

As we can see, the Plan Type 1 only exists in the odd possible results (as expected) what means in any other possible combination of the other 4 plan types he doesn’t exists (2, 4, 2+4=6, 8, 8+2=10, 8+4=12, 8+2+4=14, 16, 16+2=18, 16+4=20, 16+2+4=22, 16+8=24, 16+8+2=26, 16+8+4=28, 16+8+2+4=30).

The same is true for the other Plan types, you can try then out using the MOD. Now, this work well but there’s a way easier and clean way to do exactly the same thing using the function BITAND.

The BITAND function treats its inputs and its output as vectors of bits, the output is the bitwise AND of the inputs. Basically it performs below steps.

  • Converts the inputs into binary.
  • Performs a standard bitwise AND operation on these two strings.
  • Converts the binary result back into decimal and returns the value.

Ok, it looks more complicated now, but the good news is that to use is simpler than it sounds like. The main difference between this function and MOD is that MOD returns a boolean, BITAND return the value you asked if it’s true. Expanding my previous test using BITAND:

As you can see, with BITAND returning the number you asked for instead of 0 or 1 make it possible for us to Join the HSP_PLAN_TYPE with HSP_MEMBER using the USED_IN and the PLAN_TYPE in the BITAND Function as a Join:

As you can see, this is a far better way to split the members by Plan Type. And now we can see that the Dimension Products only exists in the Plan Type Pnl and that Entity exists in 4 different plan types. We don’t need to worry about any mathematics formula to create all our MODs, we just need to Join our Plan Type table with the BITAND of USED_IN by PLAN_TYPE.

The Consolidation is another place where you can use the exactly same thing. Instead of using something like this:

  • DECODE(MOD(CONSOL_OP,8),’0′,’+’,’1′,’-‘,’2′,’*’,’3′,’/’,’4′,’%’,’5′,’~’,’6′,’Never’,CONSOL_OP) CON1
  • DECODE(MOD(TRUNC(CONSOL_OP/8),8),’0′,’+’,’1′,’-‘,’2′,’*’,’3′,’/’,’4′,’%’,’5′,’~’,’6′,’Never’,CONSOL_OP) CON2
  • DECODE(MOD(TRUNC(CONSOL_OP/64),8),’0′,’+’,’1′,’-‘,’2′,’*’,’3′,’/’,’4′,’%’,’5′,’~’,’6′,’Never’,CONSOL_OP) CON3
  • DECODE(MOD(TRUNC(CONSOL_OP/512),8),’0′,’+’,’1′,’-‘,’2′,’*’,’3′,’/’,’4′,’%’,’5′,’~’,’6′,’Never’,CONSOL_OP) CON4
  • DECODE(MOD(TRUNC(CONSOL_OP/4096),8),’0′,’+’,’1′,’-‘,’2′,’*’,’3′,’/’,’4′,’%’,’5′,’~’,’6′,’Never’,CONSOL_OP) CON5

You can create a parameter table with the values for each kind of consolidation and use BITAND with that info:

I hope you this will be useful for you guys and see you soon.

Let’s Join DEVEPM @ KSCOPE 16

Posted in ACE, EPM, Essbase, ETL, Hyperion Essbase, Hyperion Planning, InfraStructure, Kscope 16, ODI, ODI 10g, ODI 11g, ODI 12c, ODI Architecture, ODTUG, Oracle Database, OS Command, Performance, Tips and Tricks with tags , , , , , , , , , , , , on April 5, 2016 by RZGiampaoli

Hi Guys how are you?

Just a quickly post about this year KSCOPE. This year we’ll have 2 excellent sessions:

Take a Peek at Dell’s Smart EPM Global Environment:

Ricardo Giampaoli , TeraCorp

Co-presenter(s): Rodrigo Radtke de Souza, Dell

When: Jun 27, 2016, Session 2, 10:15 am – 11:15 am

Topic: EPM Applications – Subtopic: Planning

In a fast-moving business environment, finance leaders are successfully leveraging technology advancements to transform their finance organizations and generate value for the business.
Oracle’s Enterprise Performance Management (EPM) applications are an integrated, modular suite that supports a broad range of strategic and financial performance management tools that help business to unlock their potential.

Dell’s global financial environment contains over 10,000 users around the world and relies on a range of EPM tools such as Hyperion Planning, Essbase, Smart View, DRM, and ODI to meet its needs.

This session shows the complexity of this environment, describing all relationships between those tools, the techniques used to maintain such a large environment in sync, and meeting the most varied needs from the different business and laws around the world to create a complete and powerful business decision engine that takes Dell to the next level. 

Incredible ODI Tips to Work with Hyperion Tools

Ricardo Giampaoli , TeraCorp

Co-presenter(s): Rodrigo Radtke de Souza, Dell

When: Jun 27, 2016, Session 6, 4:30 pm – 5:30 pm

Topic: EPM Platform – Subtopic: EPM Data Integration

ODI is an incredible and flexible development tool that goes beyond simple data integration. But most of its development power comes from outside-the-box ideas.

  • Did you ever want to dynamically run any number of “OS” commands using a single ODI component?
  • Did you ever want to have only one data store and loop different sources without the need of different ODI contexts?
  • Did you ever want to have only one interface and loop any number of ODI objects with a lot of control?
  • Did you ever need to have a “third command tab” in your procedures or KMs to improve ODI powers?
  • Do you still use an old version of ODI and miss a way to know the values of the variables in a scenario execution?
  • Did you know ODI has four “substitution tags”? And do you know how useful they are?
  • Do you use “dynamic variables” and know how powerful they can be?
  • Do you know how to have control over you ODI priority jobs automatically (stop, start, and restart scenarios)?

If you want to know the answer to all this questions, please join us in this session to learn the special secrets of ODI that will take your development skills to the next level.

Join us in KSCOPE 16 and book our 2 sessions in schedule. They will be very good sessions and I’m sure that you’ll learn some new stuff that will help you in your EPM Environment!

SpeakerSquare (1)

Using templates to create dynamic rules in Calcmanager 11.1.2.4

Posted in 11.1.2.4, ACE, BSO, Business Rules, CalcScript, Calculation Manager, Calculation Script, EPM, Essbase, Hacking, Hyperion Essbase, Hyperion Planning, New Features, Oracle, Performance, Templates, Tips and Tricks with tags , , , , , , , , , , , on January 1, 2016 by RZGiampaoli

Hi guys and happy new year!!!

And to start well the new year what’s best then a post?

Today I want to talk about the new version of Calculation manager (11.1.2.4). I know that it is out for a while now but still I think it has some cool features that are not explored.

In all Planning project, sooner or later, we come to a time that we need to create a currency conversion Rule (at least I like to create a custom Rule for performance reasons). Also some companies uses a lot of currencies.

Before continue I need to say that in our case I find out that less code is equal a less performance. What I mean by that is that for the forecast horizon range period for example, instead of use “IF” and test my 15/18 months horizon I triplicate the code using “FIX” and using “SET EMPTYMEMBERSETS ON ;”.

This set command ignores the “FIX” if it returns an empty set. This approach increases the performance a lot, some times more than 8 times (In this currency example, if I ran it at channel level with “IF”, toke 8 hours, with “FIX” takes 1 hours).

Ok that means I rarely use “IF” in my Rules.

Well, you can already imagine the size and row boring and prone error is the Rules if I use only “FIX” right? However, with the “Template” feature in calcmanager and the ability to call any template or rule using a script this nightmare turns in to a dream!

Let us see how it works!

A Currency conversion for forecast applications normally has two parts:

First parts is a period range part.

Second part is the currency conversion itself.

With calcmanager, we can create two template, one for the period and the other for call the currency conversion part.

Then for the Currency conversion calculation, I create a simple core template with just a formula and a script on it:

UDA Loop Template

The “dtp_Quote_UDA”  is a DTP (design time prompt) variable with a function that will insert double quotes in every value that comes from the “dtp_UDA” DTP variable (this will be used to get values from the outside template), this way we can have use just one variable to do two papers, currency name and UDA value. The code is:

@QUOTE([dtp_UDA])

The inside the Currency calculation script we will have:

Currency Script

As we can see inside the script, I used the “dtp_Quote_UDA” as well the “dtp_UDA”. This simplify the amount of parameters I need to pass and the maintenance as well. Let’s think, we need the same information, one with double quotes, for the UDA values and other without quotes, for the Rate name.

With this technic we need to pass just once the value, let’s say BRL, and in the code Calcmanager will replace before the execution in all places, and we’ll have @UDA(Entity,”BRL”) as well HSP_Rate_BRL.

This is awesome because now I have just 8 line of code that will be transformed in any amount of times I want. The best thing is, or everything is right or everything is wrong J

Because calcmanger now we have a layer between the code written and the code generated, and this is pretty cool because opens a huge windows for creativity. You can even generate the entire code dynamically.

Ok, the next step is to loop this template once for each currency we have. For this, I created another template. This one will be used for the Forecast horizon period range as well for loop the currencies.

Period loop template

Again, the code is pretty simple, just  two fixes and one script.

For the “Period FIX” we use two DTP variable to get the value of Year and period from the outside rule ([dtp_Period] and [dtp_Year]).

The product fix is just something related with our architecture and we do not need to bother about it.

Now the “Loop Currency” is a script that will call N number of times our first template. How can we do that with a script?

Basically every time you drag and drop a template inside a rule or to another template behind the graphic design calcmanager generate a command line. This code exists thanks to its API, and you can use it to manipulate and generate almost any kind of code inside calcmanger.

Currency loop template

As we can see, inside the script we have a “Fix” for the USD currency, (that is the only different conversion) and one row for each currency.

Each row is calling a template “%Template(name:=Currency Conversion – 2 – UDA Loop” from an application “application:=”WWOPS””, a plan type, “plantype:=”Pnl””, and is passing two DTS values, one for the UDA and other for the Entity, “dtps:=(“dtp_UDA”:=[[AED]],”dtp_Entity:=[[dtp_Entity]])”.

As you can see, you can pass a DTP variable using the variable itself (dtp_Entity:=[[dtp_Entity]]).

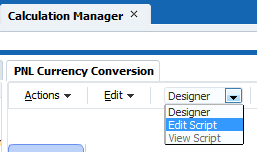
If you want to create this API code and don’t know how to write the right syntax you can just drag your template to a rule/template, set everything and change your view to “Edit Script” or “View Script”.

Edit script

Now we just need to create the rule that will call this template for the three range of periods we have:

Currency rule

Again a simple design with a small amount of components. Here we have our SET commands, a main fix and the three templates, each one calling the previous template for a different period of range.

Period Range

The final result is a Rule with 1213 rows generated from a 8 rows template. This is the magic of calcmanager and templates. You can simplify everything, you can create dynamic aggregations, that will change depending of the application and cube, you can create codes that changes depending of the member that is coming from the forms, everything with small set of code that is reusable anytime we want!

Rule code 1Currency code 2

…….

A dynamic way to build a currency rule in calcmanager. A lot faster to build and a lot easier to maintain, since if a new currency start to be used you just need to copy and paste one line in “Currency Loop” script, change the currency and it’s done.

Build Rules using templates looks more work and some time a little bit complicate but I remember well how much time I expend changing BRs and I can guarantee that this way is much faster and easier to develop and mainly to maintain.

In the end we just create a Rule and two templates that contains just one core calculation, in my case a script calling 47 times this core, some fixes, and that’s all. It was less than 60 rows of written code to generate 1213 rows. Pretty good for me 🙂

Rules ante templates

Hope you guys enjoy and I wish a happy new year for all and you dears ones.

Happy new year!!!! A new year full of surprises!


10 Important Things to Improve ODI Integrations with Hyperion Planning Part 7 (Smart Metadata Loading)

Posted in EPM, Hyperion Planning, ODI Architecture, ODI Architecture with tags , , , , , on September 13, 2013 by RZGiampaoli

Hello everybody. The time arrived to put some intelligence behind our metadata load. After some years working with Hyperion Planning, ODI and DRM (or any other metadata repository), I figure out that 90% of the metadata does not change in the month cycle maintenance (in a normal Planning application). That means, 90% of the time that a metadata integration takes is useless. It’s a lot of time if you are maintaining a big client as one of mine that the maintenance cycle took more than 8 hours for all their regions.

Luckily for them I figure out a very effective and easy way to decrease that time and now it takes less than 30 minutes for the entire maintenance cycle. Basically I developed a method that categorizes each metadata row in our tables, and based in this category the interface knows what it need to do with that data. Let’s see how it works.

After we have an inbound and extract tables with all metadata from source and target systems (as we saw in the part 5 of our series), we need to compare them and decide what to do with each metadata member. For this tie out process we created the metadata tie out table that is a merge of both inbound and extract tables containing all source and target columns with a prefix identifying each one of them plus a column called CONDITION. This extra column is used to describe what the metadata load process should do with that particular member. It is important for this table to have all sources and target columns because then we can actually see what has changed from source to target metadata of that member.

Metadata tie out process will be responsible to read both source and extract tables and populate the metadata tie out table with all source, extract and CONDITION information. The tie out process has a built in intelligence that analyzes several different load situations to each member and populates the final result in the CONDITION column. The tie out process always searches for a parent/member/application/dimension combination in the source table and match it to the parent/member/application/dimension on the target table. The process uses this combination because these are the information that represents a unique member in Planning.

Here are the possible CONDITION statuses created by the tie out process:

CONDITION status

When it happens

Match

All metadata information from the inbound source table is equal to the extract table information, so no further action is needed.

No Match

Any column from the inbound source table is not equal to the extract table information. This member will need to be updated in the target Planning Application.

Exists only in Source

If it is a new member and exists only in the inbound source metadata table it needs to be loaded to the Planning Application.

Exists only in the Application

If a member was deleted on the source system but still remains in the planning application. For those cases we created a “Deleted Hierarchy” member and move the deleted members under it. The process doesn’t physically delete the member to keep the data associated with it intact.

Moved Member

If a member moves from one parent to the other and needs to be updated in the Planning Application.

Changed Attribute member

When one attribute is moved from his parents to another parent.

Reorder sibling members

When a new member needs to be inserted in the place where other member previously belongs or a member changed place order with one of its siblings.

Deleted Share Members

When one shared member stops to exist in the inbound table and needs to be deleted from the Planning Application.

The first four conditions status are achieved by a “Full Outer Join” between the Inbound and the Extract table and a “Case When” to define the CONDITION column as we can see in the below:

Tieout Query example

Tieout Query example

This query compares all metadata columns in the source and extracts tables to see what has changed and adds to the CONDITION column what the load process should do with that row afterwards. For the other four conditions status we need to work in the data just created by the figure 9 queries.

  • Moved Members: When we execute the query from Figure 9 we get an unexpected behavior regarding moved members. A moved member is a member that changed from one parent to another. Since the query compares the member and parent names to decide if that is a new, modified or deleted member, it will consider that the source member is a new member (because it has a new parent) and the extracted member will be considered as a deleted member (because its parent/member combination does not exist in the source) generating two rows in the tie out table instead of one. To solve this issue the tie out process merge those two rows into a single one. This merge happens for all multiple rows that have the same member name but one with “Existing only in Source” condition and another one with “Exists only in the Application” condition;
  • Changed Attribute Member: Attribute members require a special logic because Hyperion Planning treats them differently. When you want to move an attribute member from one parent to another, you first need to delete the member and then insert it back in the new parent. So this is a two-step operation, instead of the normal move member operation. When the process deletes the attribute first Hyperion Planning automatically removes its value from its associated dimension member. If we don’t load the associated dimension members again their attribute values will be missing in the end of the metadata load process. To solve this issue the metadata tie out process searches for all dimension members that have a moved attribute associated with it and change their condition to NO_MATCH. This will guarantee that after moving the attribute to a new parent the process also loads all the dimension members again with its attribute values. Another particularity with attributes is that if an attribute doesn’t exist anymore in the source system it is deleted from the planning application. It is not moved to a deleted hierarchy because no data is associated directly with the attribute member, thus no data is lost;
  • Reorder sibling members: When a single member is added to an existing parent member and this parent member has other child members, planning adds the new member in the end of the list. This is because Hyperion planning doesn’t have enough information to know in which order to insert this new member as it does not have its sibling’s orders to compare to it. So the tie out process also search for all existing siblings of the new member and mark them as NO_MATCH to indicate that they should be loaded all together. This way Hyperion Planning will have all siblings orders and will load the members in the correct order;
  •  Deleted Share Members: If a share member ceases to exist in the source metadata, it is removed completely from the planning application. There is no reason to move them to a deleted hierarchy member because no data is associated directly with it;

When the tie out process finishes populating the metadata tie out table we will have all information to load only the necessary members to Planning. As this table is centralized and has all applications and dimensions in it, it is just a matter to loop it for every application and dimension needed to be loaded by the generic load component. To accomplish this,the next post will show how to make the KM and the ODI models dynamic enought to handle this.

See you next time.