Archive for ODI Expert

How to use Jython to send a dynamic HTML table email from ODI (part 1/2)

Posted in Uncategorized with tags , , , , , , on April 21, 2020 by RZGiampaoli

Hey guys how are you? Today I’ll talk a little bit how can we create a dynamic HTML table email from ODI using Jython.

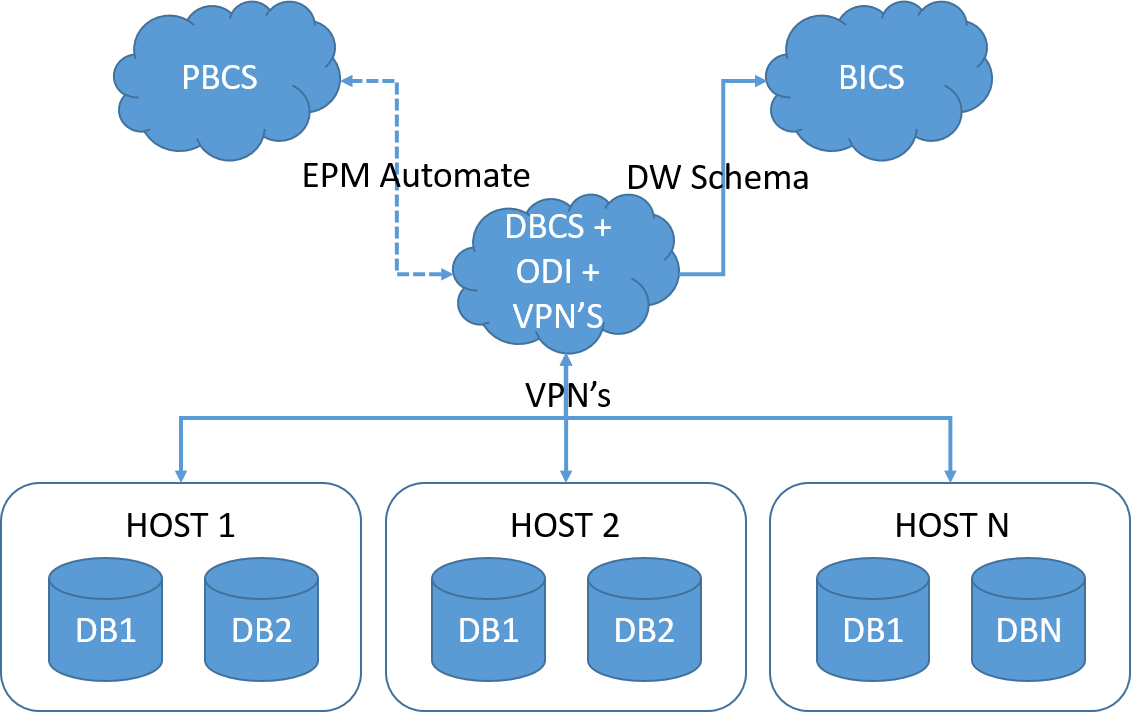
First of all, let me give you a little bit of context. I had to build an ODI process to restate the past data in our DW. That means, the business wanted, to a certain point in time, to go back all the way to the first period we have in our DW and restate the data based in a map table that they provided.

That’s all right, the biggest problem is that this table is partitioned by Source System and Period, and the business wanted the process to be flexible enough to let them run 1 period and 1 source system at time or to run an range of period and ALL sources at time (and any combination of these 2).

Also all right, my problem now is how to provide the business with a reliable way to tell them what they already run, what is still pending, if we had an error in a period or if there’s some validation fall outs in a period. In other words, how to track the process during execution.

My answer to that, I decide to send a email with a table that shows the source system and years in the rows and the months in the columns, and based in a color code, I paint the cells based in the status of the execution.

This post will be about the Jython/HTML code we wrote and the next post will be about how to make it dynamic in ODI. Let’s start it with the Jython part:

import smtplib

from email.mime.multipart import MIMEMultipart
from email.mime.text import MIMEText

mailFrom = "ODI Services <donotreply@ODI.com>"
mailSend = 'email@here.com'

msg = MIMEMultipart()
msg['Subject'] = "Subject here"
msg['From'] = mailFrom
msg['To'] = mailSend

html = 
"""\

HTML CODE HERE

"""

part = MIMEText(html, 'html')
msg.attach(part)
s = smtplib.SMTP('SMTP SERVER HERE')
s.sendmail(mailFrom, mailSend.split(','), msg.as_string())
s.quit()

This is everything you need to have in your procedure to send a HTML code by email. It’s a very simple code, basically we import “smtplib” lib and that will handle the email sending, after that we just need to inform the user, password and SMTP server and use the “sendmail” to send the email. Pretty straight forward.

Now, in the meddle of the code, we have the HTML part that needs to be included. In our case, it’ll be a table. To test the HTML code, you can google “HTML test runner” that it’ll bring a lot of places in the internet where you can run your HTML code and test to see the results. It’s pretty handy, and I’m using this one here.

To create a simple table in HTML we just need this code here:

This code is also fairly simple and basically we have:

  1. <TABLE> tag, where you define the margins, border size, width of the table, cell padding and cell spacing. There’s more options there but you can easily find in the HTML doc.
  2. <TR> tag, where you define the amount of columns using the COLSPAN property as well the alignment of the text there
  3. <TH> tag, where we define the cells of our table itself. There’re a lot of properties for this but I’m using juts a fix 20% width for each cell, just to size them the same (since I have 5 columns), the Color of the cells and the message I want to send.

This is my legend table that will come above my real table, but the configuration is the same in both cases. We’ll have one <TR> block for each line we want to have and as much <TH> lines we need for each cell we want to have. In the end my final table is like this:

As you can see, I send an email with all periods that needs to be restatement showing if the interface already ran, if that was a success, or it had warnings or errors (with the link straight to the error file, if it was not loaded yet and even if we don’t had the partition created for that period/source.

Now, as I said, we need one <TR> per line and, in this case, 16 <TH>, one per cell. As you can imagine, that’s a lot of code that needs to be write there. thanks god I’m using ODI to do that for me, and we’ll take a look on this in the next post.

Thank you guys and see you soon.

Kscope 17 is approaching fast!!! And we’ll be there!

Posted in ACE, Data Warehouse, Essbase, Hyperion Essbase, Java, Kscope 17, ODI, ODI Architecture, Oracle, Performance, Tips and Tricks, Uncategorized with tags , , , , , , , , on June 8, 2017 by RZGiampaoli

Hi guys how are you? We are sorry for being away for so much time but this year we have a lot of exiting things going one, then let’s start with what we’ll be doing at Kscope 17!

This year we’ll present 2 sessions:

Essbase Statistics DW: How to Automatically Administrate Essbase Using ODI (Jun 28, 2017, Wednesday Session 12 , 9:45 am – 10:45 am)

In order to have a performatic Essbase cube, we must keep vigilance and follow up its growth and its data movements so we can distribute caches and adjust the database parameters accordingly. But this is a very difficult task to achieve, since Essbase statistics are not temporal and only tell you the cube statistics is in that specific time frame.

This session will present how ODI can be used to create a historical statistical DW containing Essbase cube’s information and how to identify trends and patterns, giving us the ability for programmatically tune our Essbase databases automatically.

And…

Data Warehouse 2.0: Master Techniques for EPM Guys (Powered by ODI)  (Jun 26, 2017, Monday Session 2 , 11:45 am – 12:45 pm)

EPM environments are generally supported by a Data Warehouse; however, we often see that those DWs are not optimized for the EPM tools. During the years, we have witnessed that modeling a DW thinking about the EPM tools may greatly increase the overall architecture performance.

The most common situation found in several projects is that the people who develop the data warehouse do not have a great knowledge about EPM tools and vice-versa. This may create a big gap between those two concepts which may severally impact performance.

This session will show a lot of techniques to model the right Data Warehouse for EPM tools. We will discuss how to improve performance using partitioned tables, create hierarchical queries with “Connect by Prior”, the correct way to use multi-period tables for block data load using Pivot/Unpivot and more. And if you want to go ever further, we will show you how to leverage all those techniques using ODI, which will create the perfect mix to perform any process between your DW and EPM environments.

These presentations you can expect a lot of technical content, some very good tips and some very good ideas to improve your EPM environment!

Also I’ll be graduating in this year leadership program and this year we’ll be all over the place with the K-Team, a special team created to make the newcomers fell more welcome and help them to get the most of the kscope.

Also Rodrigo will be at Tuesday Lunch and Learn for the EPM Data Integration track on Cibolo 2/3/4.

And of course we will be around having fun an gathering new ideas for the next year!!!

And the last but not least, this year we’ll have a friend of us making his first appearance at Kscope with the presentation OBIEE Going Global! Getting Ready for More Than +140k Users (Jun 26, 2017, Monday Session 4 , 3:15 pm – 4:15 pm).

A standard Oracle Business Intelligence (OBIEE) reporting application can hold more or less 1,200 users. This may be a reasonable number of users for the majority of the companies out there, but what happens when an IT leader like Dell decides to acquire another IT giant like EMC and all of their combined 140,000-plus users need to have access to an HR OBIEE instance? What does that setup looks like? What kind of architecture do we need to have to support those users in a fast and reliable way?
This session shows the complexity of Dell’s OBIEE environment, describing all processes and steps performed to create such environment, meeting the most varied needs from business demands and L2 support, always aiming to improve environment stability. This architecture relies on a range of different technologies to support that huge amount of end users such as LDAP & SSL, Kerberos, SSO, SSL, BigIP, Shared Folders using NAS, Weblogic running into a cluster within #4 application servers.
If the challenge was not hard enough already, all of this setup also needed to consider Dell’s legacy OBIEE upgrade from v11.1.1.6.9 to v11.1.1.7.160119, so we will explain what were the pain points, considerations and orchestration needed to do all of this in parallel.

Thank you guys and see you there!

kscope17logo-pngm

PBCS, BICS, DBCS and ODI!!! Is that possible???

Posted in 11.1.1.9.0, 11.1.2.4, ACE, BICS, DBCS, EPM, EPM Automate, ODI, ODI 10g, ODI 11g, ODI 12c, ODI Architecture, ODI Architecture, Oracle, OS Command, PBCS, Performance, Uncategorized with tags , , , , , , , on August 15, 2016 by RZGiampaoli

Hey guys, today I’ll talk a little bit about architecture, cloud architecture.

I just finished a very exciting project in Brazil and I would like to share how we put everything together for a 100% cloud solution that includes PBCS, BICS, DBCS and ODI. Yes ODI and still 100% cloud.

Now you would be thinking, how could be 100% cloud if ODI isn’t cloud yet? Well, it can be!

This client doesn’t have a big IT infrastructure, in fact, almost all client’ databases are supported and hosted by providers, but still, the client has the rights to have a good forecast and BI tool with a strong ETL process behind it right?

Thanks to the cloud solutions, we don’t need to worry about infrastructure anymore (or almost), the only problem is… ODI.

We still don’t have a KM for cloud services, or a cloud version of ODI, them basically we can’t use ODI to integrate could tools….

Or can we? Yes we can 🙂

The design is simple:

  1. PBCS: Basically we’ll work in the same way we would if it was just it.
  2. BICS: Same thing here, but instead of use the database that comes with BICS, we need to contract a DBCS as well and point the DW schema to it.
  3. DBCS: here’s the trick. Oracle’s DBCS is not else then a Linux machine hosted in a server. That means, we can install other things in the server, other things like ODI and VPN’s.
  4. ODI: we just need to install it in the same way we would do in an on premise environment, including the agent.
  5. VPN’s: the final touch, we just need to create VPN’s between the DBCS and the client DB’s, this way ODI will have access to everything it needs.

Yes you read it right, we can install ODI in the DBCS, and that makes ODI a “cloud” solution.

cloud solution

The solution looks like this:

BICS: It’ll read directly from his DW schema in the DBCS.

PBCS: There’re no direct integration between the PBCS and DBCS (where the ODI Agent is installed), but I found it a lot better and easy to integrate them using EPM Automate.

EPM Automate: With EPM Automate we can do anything we want, extract data and metadata, load data and metadata, execute BR and more. For now the easiest way to go is create a script and call it from ODI, passing anything you need to it.

VPN’s: For each server we need to integrate we’ll need one VPN created. With the VPN between the DBCS and the hosts working, use ODI is extremely strait forward, we just need to create the topology as always, revert anything we need and work in the interfaces.

And that’s it. With this design you can have everything in the cloud and still have your ODI behind scenes! By the way, you can exactly the same thing with ODI on premise and as a bonus you can get rid of all VPN’s.

In another post I’ll give more detail about the integration between ODI and PBCS using EPM Automate, but I can say, it works extremely well and as far I know is a lot easier than FDMEE (at least for me).

Thanks guys and see you soon.


Let’s Join DEVEPM @ KSCOPE 16

Posted in ACE, EPM, Essbase, ETL, Hyperion Essbase, Hyperion Planning, InfraStructure, Kscope 16, ODI, ODI 10g, ODI 11g, ODI 12c, ODI Architecture, ODTUG, Oracle Database, OS Command, Performance, Tips and Tricks with tags , , , , , , , , , , , , on April 5, 2016 by RZGiampaoli

Hi Guys how are you?

Just a quickly post about this year KSCOPE. This year we’ll have 2 excellent sessions:

Take a Peek at Dell’s Smart EPM Global Environment:

Ricardo Giampaoli , TeraCorp

Co-presenter(s): Rodrigo Radtke de Souza, Dell

When: Jun 27, 2016, Session 2, 10:15 am – 11:15 am

Topic: EPM Applications – Subtopic: Planning

In a fast-moving business environment, finance leaders are successfully leveraging technology advancements to transform their finance organizations and generate value for the business.
Oracle’s Enterprise Performance Management (EPM) applications are an integrated, modular suite that supports a broad range of strategic and financial performance management tools that help business to unlock their potential.

Dell’s global financial environment contains over 10,000 users around the world and relies on a range of EPM tools such as Hyperion Planning, Essbase, Smart View, DRM, and ODI to meet its needs.

This session shows the complexity of this environment, describing all relationships between those tools, the techniques used to maintain such a large environment in sync, and meeting the most varied needs from the different business and laws around the world to create a complete and powerful business decision engine that takes Dell to the next level. 

Incredible ODI Tips to Work with Hyperion Tools

Ricardo Giampaoli , TeraCorp

Co-presenter(s): Rodrigo Radtke de Souza, Dell

When: Jun 27, 2016, Session 6, 4:30 pm – 5:30 pm

Topic: EPM Platform – Subtopic: EPM Data Integration

ODI is an incredible and flexible development tool that goes beyond simple data integration. But most of its development power comes from outside-the-box ideas.

  • Did you ever want to dynamically run any number of “OS” commands using a single ODI component?
  • Did you ever want to have only one data store and loop different sources without the need of different ODI contexts?
  • Did you ever want to have only one interface and loop any number of ODI objects with a lot of control?
  • Did you ever need to have a “third command tab” in your procedures or KMs to improve ODI powers?
  • Do you still use an old version of ODI and miss a way to know the values of the variables in a scenario execution?
  • Did you know ODI has four “substitution tags”? And do you know how useful they are?
  • Do you use “dynamic variables” and know how powerful they can be?
  • Do you know how to have control over you ODI priority jobs automatically (stop, start, and restart scenarios)?

If you want to know the answer to all this questions, please join us in this session to learn the special secrets of ODI that will take your development skills to the next level.

Join us in KSCOPE 16 and book our 2 sessions in schedule. They will be very good sessions and I’m sure that you’ll learn some new stuff that will help you in your EPM Environment!

SpeakerSquare (1)

Remotely Ziping files with ODI

Posted in 11.1.1.9.0, ACE, Configuration, EPM, Essbase, ETL, Hacking, Hyperion Essbase, InfraStructure, ODI, ODI 10g, ODI 11g, ODI 12c, ODI Architecture, ODI Architecture, OS Command, Performance, Remotely, Tips and Tricks, Zip Files with tags , , , , , , , , , , , on April 5, 2016 by RZGiampaoli

Hi guys how are you? It has been a long time since last time I wrote something but it was for a good reason! We were working in our two Kscope sessions! Yes, this year we will have 2 sessions and I think they will be great!

Anyway, let us get to the point!

Today I want to talk about something that should be very simple to do it but in the end, it is a nightmare…. Zip a file in a remote server…

A little bit of context! I was working in a backup interface for one client and, because their cubes are very big, I was trying to improve the performance as much as I can.

Part of the backup was to copy the .ind and .pag files and the data extract files as well. For an app we are talking in 30 gb of .pag and 40 gb of data extract files.

Their ODI infrastructure is like this:

Infrastructure

Basically I need to extract/copy data from Essbase server to the disaster recovery server (DR Server). Nothing special here. The problem is, because the size of the files I wanted to Zip the files first and then send it to the DR server.

If you use the ODI tools to Zip the file, what it does is bring all the files to the ODI Agent server, zip everything and the send it back. I really do not want all this traffic in the network and all the time lost in this process (also, the agent server is a LOT less powerful then the Essbase server).

Regular odi tools zip process

Then I start to research how I could do that (and thank you my colleague and friend Luis Fernando Cairo that help me a lot doing a lot of tests on this)

First of all we have three main options here:

  1. Create a .bat file and run it remotely: I did not like it because I do not want a lot of .bats all over the places
  2. Use windows invoke command: I need a program in the server like 7 zip or so and I don’t have access to install freely and I do not want to install zip’s program all over the places too
  3. Use Psexec to execute a program in the server: Same as the previous one.

Ok, I figure out that in the end I’ll need to create/install something in the server… and I rate it. Well, let’s at least optimize the problem right!

Then I was thinking, what I have in common in all Hyperion servers? The answer is JAVA.

Then I thought, I can use the JAR command to zip a file:

jar cfM file.zip *.pag *.ind

Where:

c: Creates a new archive file named jarfile (if f is specified) or to standard output (if f and jarfile are omitted). Add to it the files and directories specified by inputfiles.

f: Specifies the file jarfile to be created (c), updated (u), extracted (x), indexed (i), or viewed (t). The -f option and filename jarfile are a pair — if present, they must both appear. Omitting f and jarfile accepts a “jar file” from standard input (for x and t) or sends the “jar file” to standard output (for c and u).

M: Do not create a manifest file entry (for c and u), or delete a manifest file entry if one exists (for u).

Humm, things start to looks better. Now I had to decide if I would use the Invoke command or Psexec.

I started trying the Invoke command, but after sometime I figure out that I can’t execute the jar command using invoke.

Then my last alternative was Psexec.

The good thing about it is that is a zip file that you need just to unzip in the agent server, set it in the Environment Variables (PATH) and you are good to go.

It works amazingly.

You can run anything remotely with this and it’s a centralized solution and non-invasive as well (what I liked).

You just need to:

psexec \\Server  -accepteula  -w “work dir” javapath\jar cfM file.zip *.pag *.ind

Where:

-w: Set the working directory of the process (relative to remote computer).

-accepteula: This flag suppresses the display of the license dialog.

There’s one catch, for some unknown reason, the ODI agent does not get the PATH correctly then you need to use the complete path where it was “Installed”. The ODI is like this:

OdiOSCommand “-OUT_FILE=Log_Path/Zip_App_Files-RUM-PNL.Log” “-ERR_FILE =Log_Path /Zip_App_Files-RUM-PNL.err”

D:\Oracle\PSTools\psexec \\server -accepteula -w \\arborpath\APP\RUM\PNL\ JAVA_PATH\jdk160_35\bin\jar cfM App_Files-RUM-PNL.zip *.pag *.ind

With this, we will have a process like this:

Remotly Zip Process

This should not be something that complicate but it is and believe me, I create a very fast process and the client is very happy.

I hope you guys enjoy it and see you soon.

Oracle ACE Program Second Level up!

Posted in ACE, EPM, Oracle, OTN with tags , , on February 24, 2016 by Rodrigo Radtke de Souza

Hi all!

Quick post today just to announce that Oracle ACE Program just promoted me to Oracle ACE status!!!

O_ACELogo_clr
Now DEVEPM has the only two Oracle ACEs in the BI track for the entire Brazil 🙂

Capture
As we said when we first got awarded as ACE Associates, we are extremely happy and honored to be part of this team. Thanks for all of our readers for your support! This award just give us more motivation to keep working and bring more cool stuff for you all!

See ya!

Tips and Tricks: Working with ODI Variables and Global Parameters

Posted in ODI Architecture with tags , , , , , , , , , , , , on September 7, 2015 by RZGiampaoli

Hi guys, today we’ll talk about some very simple but powerful technic that we always use in our integrations. Its joins two concepts together and make our lives a lot easier and our integration a lot more dynamic. We are talking about variables and the concept of “Global” parameters.

In our integrations we never, ever have anything hard coded. Every time you hard code something it will come back to bite you in the future that is for sure.

Then the first thing we do in a project is to create a table that we call ODI_PARAMETER. This table will contain all configuration and parameters that needs to be validated, hard coded and so one.

I like to create this table in our work schema (to make easier to use) and its look like this:

ODI_PARAMETER Table

The “SESSION_NM” is used to make the variable reusable in all scenarios that we want, meaning we’ll have only one variable for packages in the project or even for all projects (if we make this variable global in ODI).

How it works? First of all we need to get the “Session Name” for our “Scenario/Package”. Why did I say “Scenario/Package”? Because the result could change depending if you are running a Scenario or a Package. Let me explain this.

To get the “Session Name” in ODI we use an ODI Substitution method called “odiRef.getSession”. This method has other parameter that could return the Session ID, and other stuff but what matters for us is the “SESS_NAME” parameter, that will return the name of the session, the same thing that appears in the operator when we run any object in ODI.

Why I said object? Because if you run a variable the session name will be the variable name. If you run an interface, the session name will be the interface name, it goes to procedure, package and scenario, and that is why I separate the “Scenario/Package” because if we do not pay attention, the name of the package would be different of the name of the scenario, causing a problem when we run one of them.

Let me show how it works. First of all, we’ll create a Global ODI variable called SESSION_NM (could be whatever you want, I just like to call it like this) and we’ll put this code inside of it:

SESSION_NM Variable

After that, we will run this variable to see the results:

SESSION_NM Results

As we can see, the value of the variable was the name of the Variable itself. Now, let us create a package, put this variable inside it, and see what’s happens:

Package test 1

Here is what the interface looks like and above its results:

Package test 1 results

As we can see the result of the variable is the same as the session but in UPPER case since I create the variable like this. But why I did that? Let me create a scenario of this package to show you why:

Scenario Creation

And this is why I create in the variable getting the result and put in UPPER and why I said we need to worry about some peculiarity regarding Scenarios and Packages. When you create a scenario will have the name of the interface in UPPER case and also, NO SPACES. Now, if we run the just created scenario we will have:

Scenario results

Meaning, if we will use the result of this variable as a way to return data from a table, we’ll have a problem because it’ll not find the same result if you run the package or the scenario of that package.

The easiest way to resolve that is to have the name of the main scenario (the scenario that will contain all the other scenarios) with no spaces and no special characters (ODI also transform special characters like % in to _).

Doing that and we are good to continue as we can see below:

Package results

Now we have the same results if we run the package or the scenario.

Ok next let us create another variable to return the LOG_PATH, the path where we will store all our logs from our integrations. The code that we will use for this variable is:

Query ODI_PARAMETER

As we can see we are using the result of the “SESSION_NM” variable in this “LOG_PATH” variable. This is what’ll make this variable reusable in all “Packages/Scenarios/Procedures”. Let us insert a value inside our ODI_PARAMETER Table and run the Package to see the results:

Insert Test 1

Package 1 Results

Now let us create a new package with a different name, use the same variable as above, and insert a new line in our ODI_PARAMETER table for the new interface:

Package 2 results

See, same code, two different results. That means, 90% of the interfaces needs just to be duplicated and the parameters in ODI_PARAMETER needs to be inserted for the new interface and it is done. Also, we don’t need a ton of variables to get different results. And there is more.

The code of the variable also does not change that much. For a new variable, we just need to duplicate the LOG_PATH variable and change the PARAMETER_TYPE, PARAMETER_NAME and PARAMETER_VALUE to get any other information from the ODI_PARAMETER. That means, easier to maintain.

However, let us not stop here. In this example, we are getting the LOG_PATH for our logs in our integrations. Normally this path does not change from integration to integration. What changes is the name of the integration that we are logging right? In addition, with our SESSION_NM variable we could just put in our LOG_PATH variable the root of our LOG folder and then use like this:

#LOG_PATH\#SESSION_NM

This would make the LOG_PATH equal for all integration right. Nevertheless, in the way we create our variables we will need to insert one line for each integration in our ODI_PARAMETER table right.

Well, we just need to change a little bit our code in our variable to create the concept of GLOBAL parameters. How it will work:

First, we will delete the two lines we just created and then we will insert just one line in ODI_PARAMETER table:

Insert Global

Now we just need to change the code from our LOG_PATH variable to this:

Query ODI_PARAMETER global

And here we go:

Global results

We have one global parameter that can be used for all integrations. And the cool thing is that the code above tests if we have a parameter for the actual SESSION_NM and if not it’ll get the parameter from the GLOBAL parameter, meaning if any integration needs a special LOG_PATH or something you just need to insert a new line in the ODI_PARAMETER to get the value just for that integration:

Global results exceptions

This will guarantee that you never ever needs to touch your code again to test or change anything that the business ask you for.

As I said, is a simple but very powerful tool to use.

Hope you guys enjoy and see you soon.

Quick OBIEE Trick

Posted in Dahsboard, OBIEE, Performance, Tips and Tricks with tags , , , on March 10, 2015 by RZGiampaoli

Hi guys, hope everyone is well. Today I want to talk a little bit about an OBIEE trick (doesn’t looks like but I work with that too :)).

Other day I was in a client that was complaining about a performance issue in a Condition validation in a Dashboard.

Basically they have a Dashboard with a prompt and a condition to select the Analysis that they want to show in the dashboard.

To build that they used the normal approach:

Create a Variable prompt:

Prompt Creation

Then they created 6 analysis and a Dummy column in each analysis to be used as prompt filter:

Edit Formula

In this dummy column they created a “CASE” formula getting the return of the presentation variable of the prompt and transforming it in a 0 or 1 (false or true).

After create the dummy column they used it in the filter like this:

Edit Filter

Finally, they put all together in the dashboard and used the condition to show only the analysis that has more than 0 rows:

Select Condition

Select Condition2

The trick here is simple, when the “Analysis 1” is selected it will return “Analysis 1” in the “varId” presentation variable. The Case in the analysis will transform this value in 0 or 1 and it will make one Analysis return rows and the other returns none.

The “Condition” in the dashboard will count the amount of rows of each report and will show the report that have more than ZERO rows.

And here’s where my trick is handy. What is the problem with this approach? Obiee must count all the rows that return in all analysis before show it in the screen.

In my client case, they have 6 huge Analysis in this prompt and the time to count the rows in any of the six analysis was bigger than show in the screen the report itself (Remember, Obiee default limit is 25 rows but when you count something it’ll count all the rows that returns not only the 25). (Also I do not know about other clients but all my clients loves to have huge list reports that the ERP does not provides in OBIEE, and it’s not only Brazilian clients, US clients too).

Anyway, this process took a lot longer than I like it, then I created a simple and powerful work around to this.

The idea here is almost the same but with some little differences. First of all we don’t need that dummy column and the filter anymore in the Analysis then let’s remove then:

Analysis1

Analysis2

Now we will create a new analysis. This analysis will be create using a “Direct database Request”.

Direct Database Request

The analysis is simple. We will do a query against the dual table using “CONNECT BY“, “LEVEL” and the return of the presentation variable from the prompt:

Well, what the connect by and the level does. Basically it returns the amount of lines that we want to, for example:

Connect by

In this example, I put 4 in the “LEVEL” and it returns 4 rows, if I put 6 there it’ll return 6 rows and so one. This is an awesome way to generate data without a PL.

Ok now we need to replace the 4 by the “varId” from our Prompt and we’ll have something like this:

Direct Database sql

Now, with this, if the prompt returns “Analysis 1” this query will return 1 row, if it returns “Analysis 2” the query will return 2 rows as we can see here:

Direct Database Request test

Direct Database Request test2

The final touch. We need only to change our condition and make use of our sub query. Because OBIEE condition only counts the amount of rows from an analysis I had to create this “CONNECT BY LEVEL” clause. It was the only one to control the amount of rows depending of the prompt.

With this OBIEE will, instead of count an entire analysis, it will count only a very small and limited amount of rows, and we need only to say that the “Analysis 1” will appears if the amount of rows is 1 and the “Analysis 2” will appears if the amount of rows is 2 and so one:

New Select Condition

New Select Condition2

And the result is:

Results 1

Results 2

This is a very simple but powerful, reliable and faster way to implement an Analysis prompt in OBIEE, and the best part is that if you do not have it yet you can create it without the need of change your current analysis.

Hope you guys enjoy this. See you soon.